

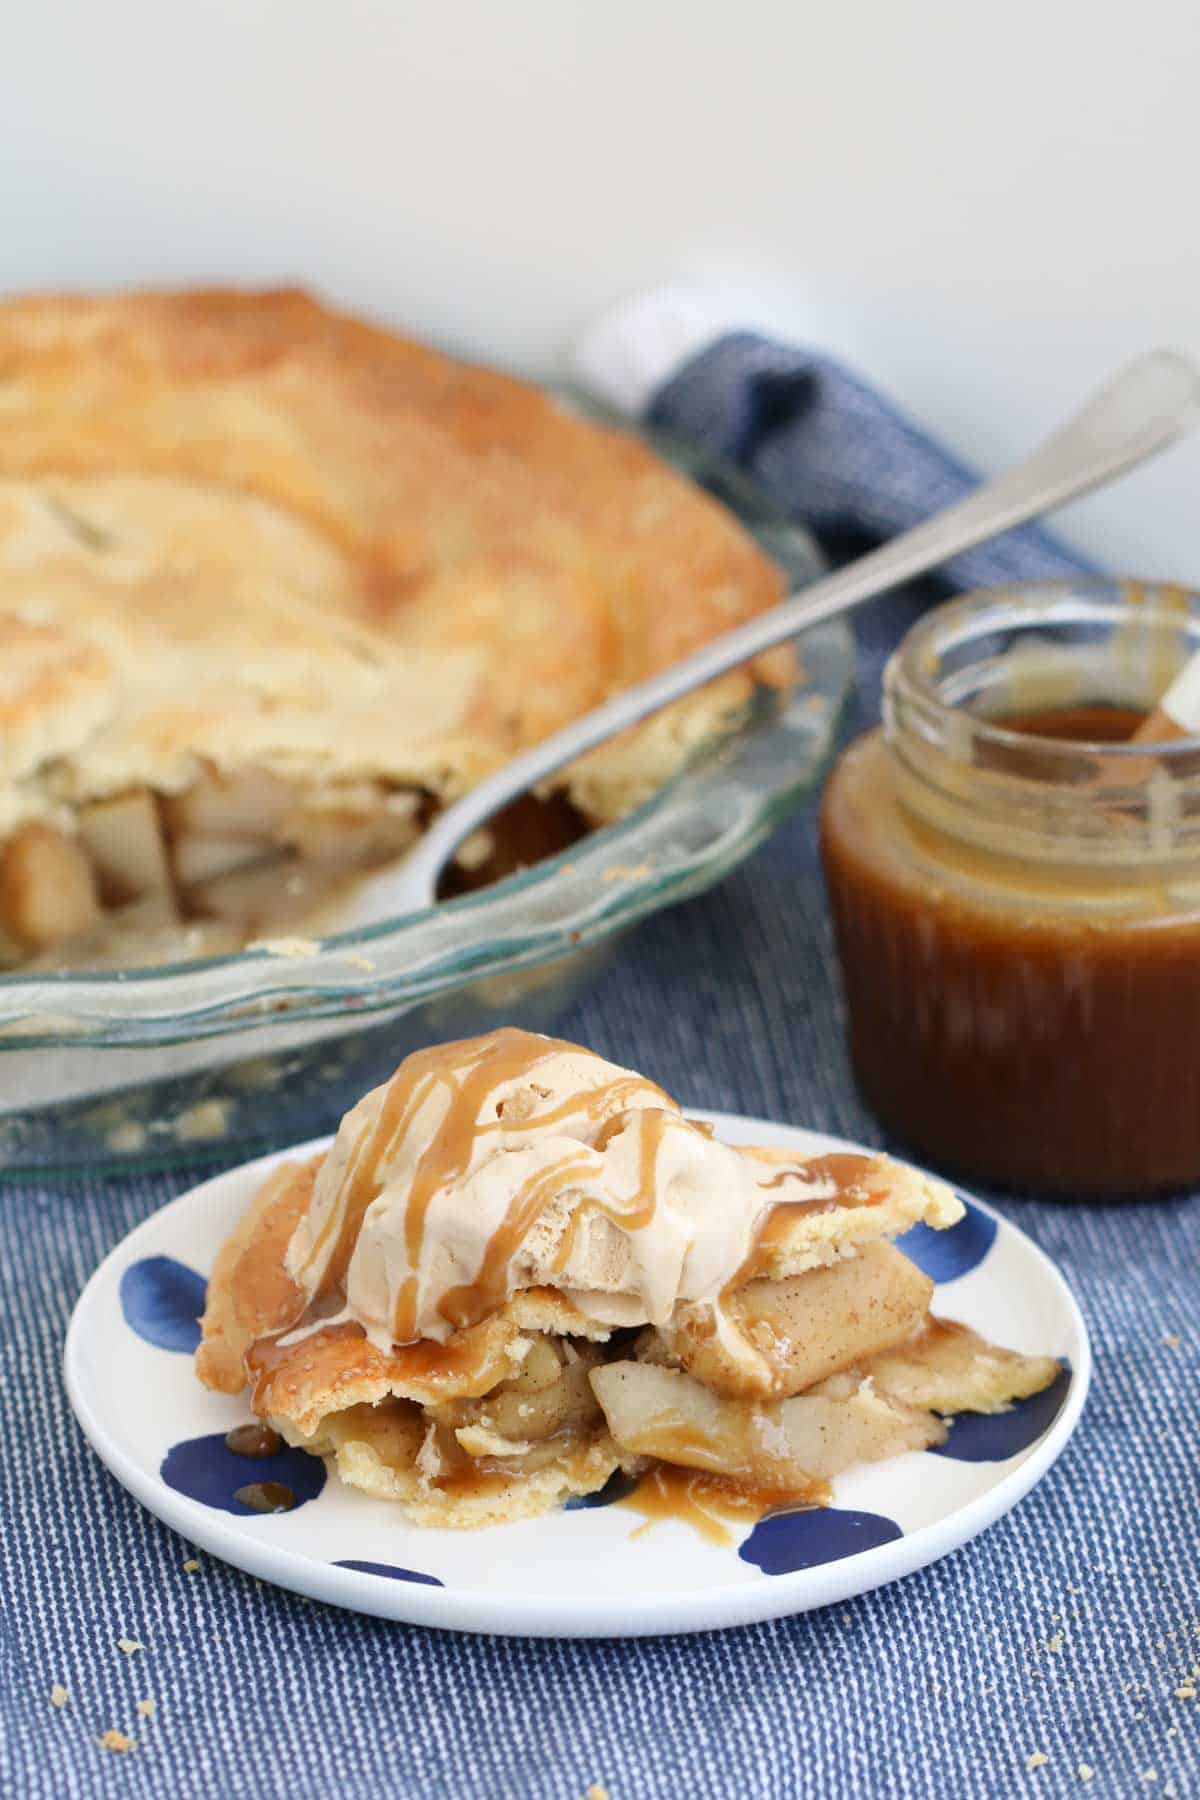
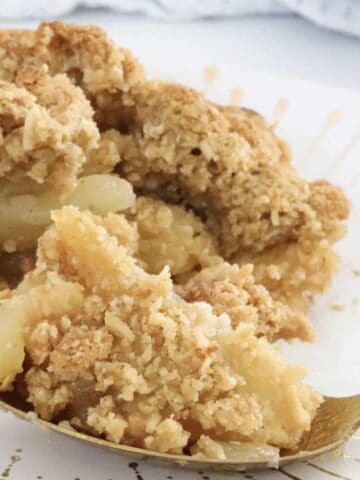
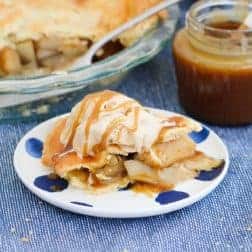
Nothing beats easy homemade apple pie - golden pastry, warm cinnamon apples and ice cream. Made from scratch, simple and foolproof, with Thermomix or conventional methods.
If you love cosy bakes like my Apple Crumble or Golden Syrup Dumplings, this pie will feel right at home on your table.
This is my go to apple pie recipe. Easy to make and there is nothing like a pie with homemade pastry.
This is a family favourite dessert at our place.
- Jodie
A homemade apple pie from scratch is one of those recipes that instantly makes a house feel like home. The buttery pie crust pastry, the smell of cinnamon drifting from the oven, the whole family ready to dig in - it's old-fashioned comfort at its best.
This recipe is designed to be fuss-free: only 8 ingredients, no blind baking, and flexible enough to work with fresh apples, canned filling or even a shortcut pastry crust. If you've ever been put off making pastry, this easy apple pie pastry will change your mind - it's quick, forgiving, and gives the pie that perfect crisp, flaky finish.
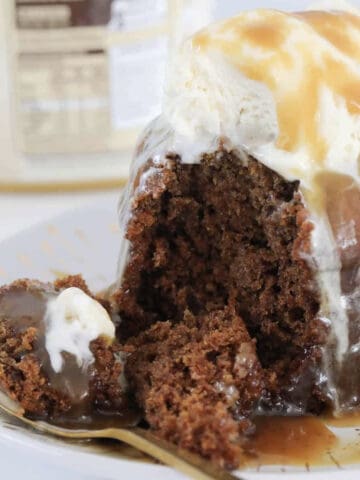
For more family-favourite fruity desserts, you might also love my Chocolate Self-Saucing Pudding, Apricot Pie or Apple Sponge Pudding.
Jump to:
Why You're Going To Love This Recipe
- Easy homemade pastry - no blind baking, no fuss.
- Thermomix + conventional methods - clear step-by-step instructions either way.
- Flexible filling - use fresh apples, canned pie apple or even mix in caramel.
- Classic & nostalgic - a true old-fashioned apple pie recipe packed with delicious flavor.
- Freezer-friendly - bake ahead and enjoy later.
Pie Ingredients
You'll need a few pantry staples and some apples:
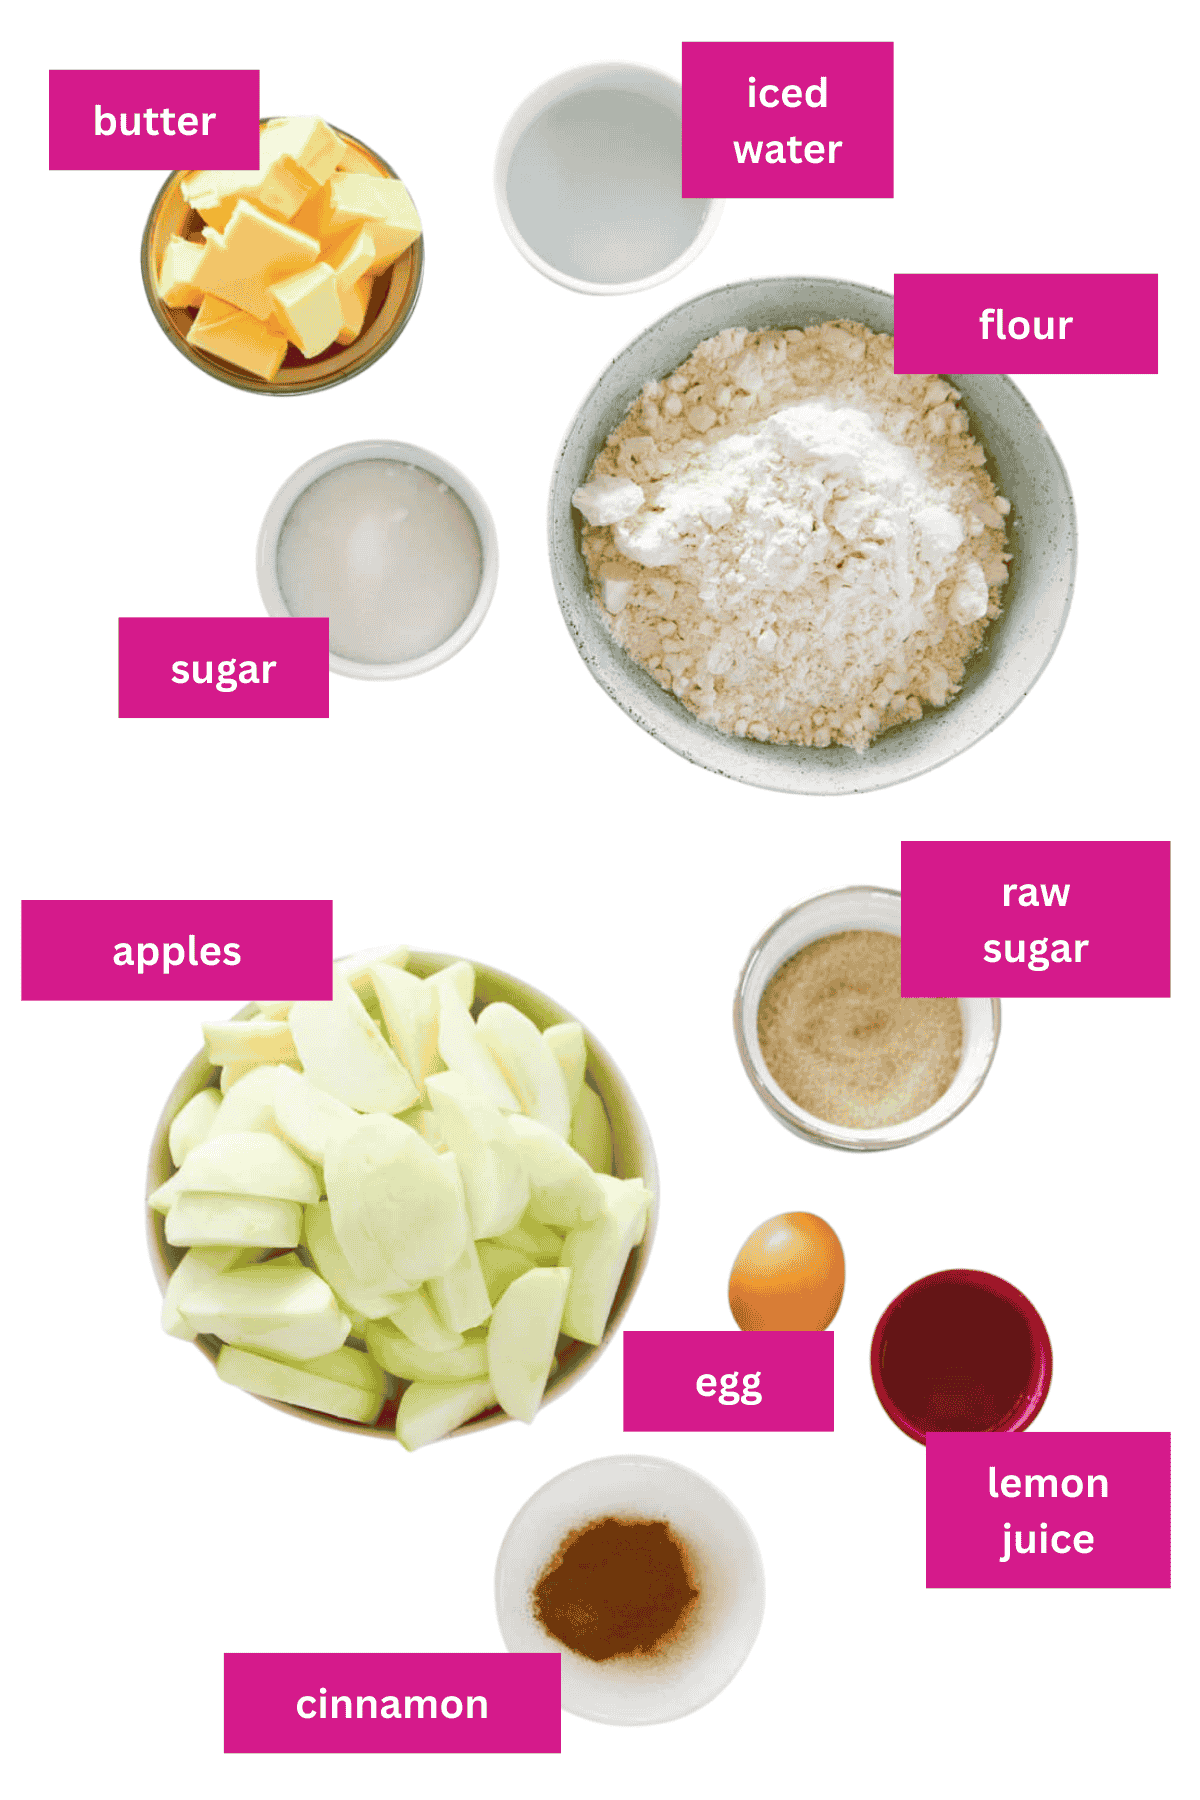
- Apples - Granny Smith are best for their tart flavour and firm texture, but Pink Lady, Jonathan, or even canned pie apple all work.
- Pastry - make my buttery shortcrust from scratch, or use store-bought shortcrust/puff pastry if you're short on time.
- Lemon juice - just a squeeze keeps the apples from browning and balances the sweetness.
Variations
- Gluten-Free Apple Pie - swap the flour for a GF blend or use a gluten-free pastry.
- Easy Apple Pie with Puff Pastry - top the pie with puff pastry for a bakery-style finish.
- Canned Apple Shortcut - use 800g canned pie apple and skip the cooking step.
- Caramel Twist - stir caramel sauce through the apple filling for a decadent dessert.
- Apple Pie Spices - add a pinch of nutmeg, ground ginger or mixed spice along with the ground cinnamon for extra warmth and flavour.
How To Make Easy Apple Pie
Making a pie from scratch doesn't have to be tricky - here's how:
Note: Scroll to the recipe card at the bottom for the ingredients quantities and full detailed method.
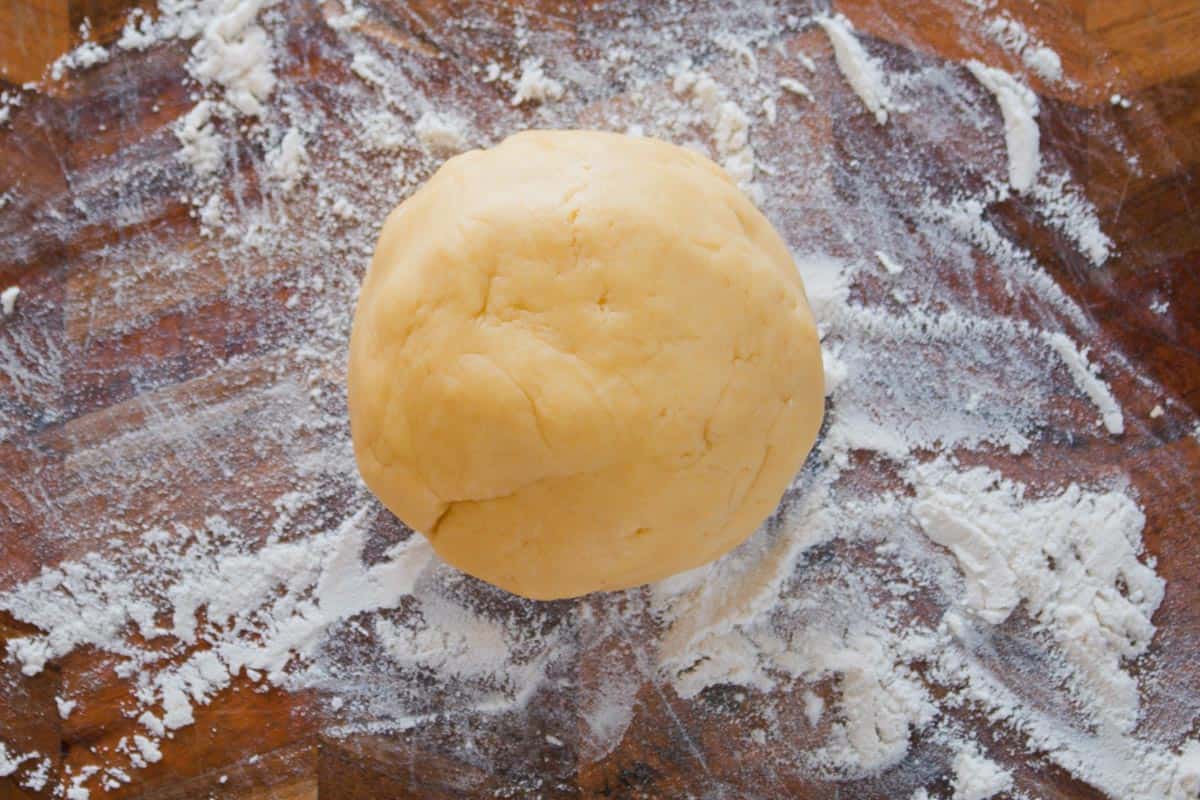
- Step 1: Make the pastry - process flour, butter and sugar, then add cold water until a dough forms. Chill in the refrigerator for 30 minutes.
- Step 2: Cook the apples - peel the apples and then simmer with water until just soft, then stir in sugar, lemon juice and cinnamon.
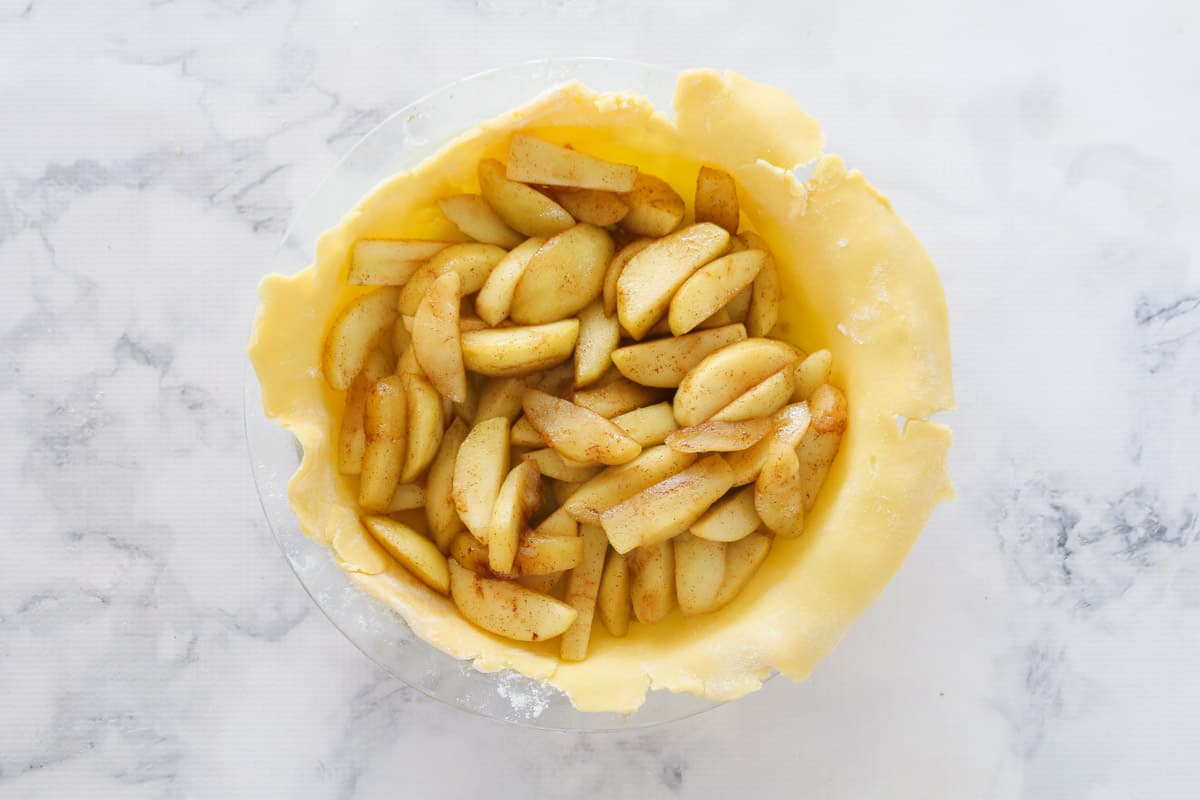
- Step 3: Assemble the pie - using a rolling pin, roll out the pie dough into base and top layers. Line a pie pan or dish, add the apple pie filling, top with pastry, and crimp the edges.
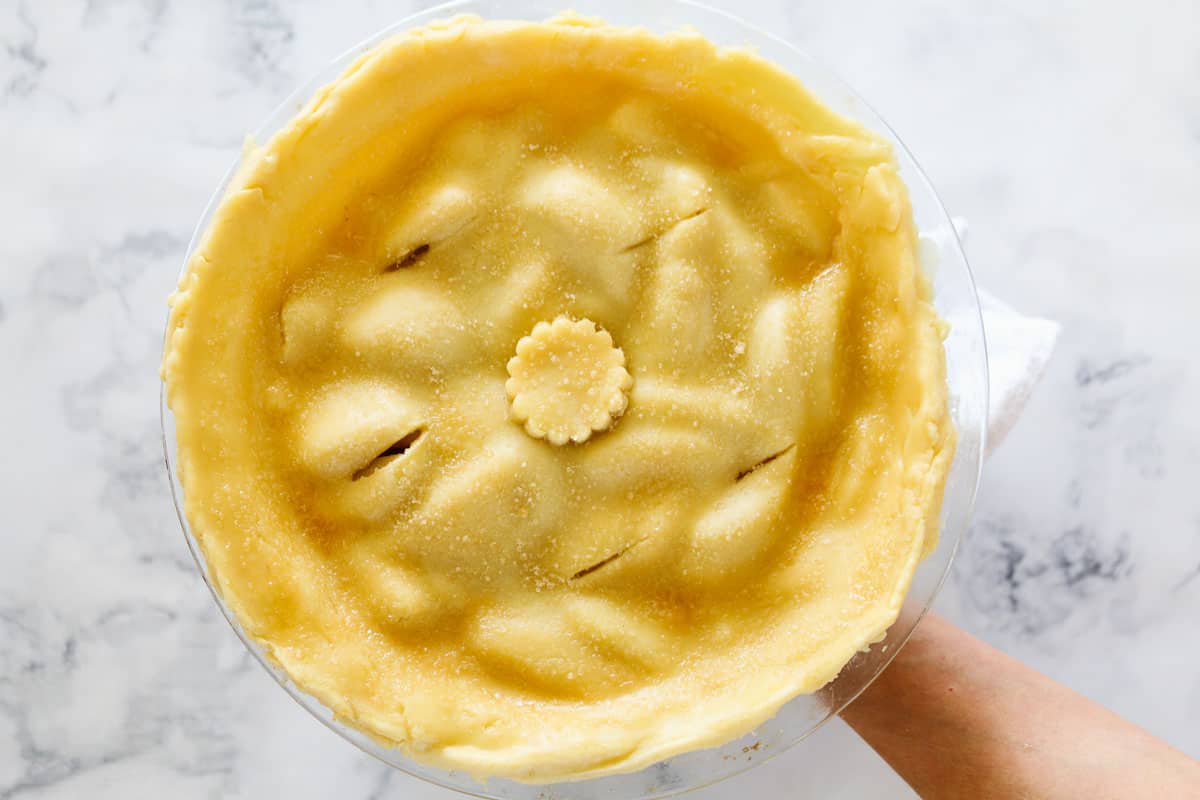
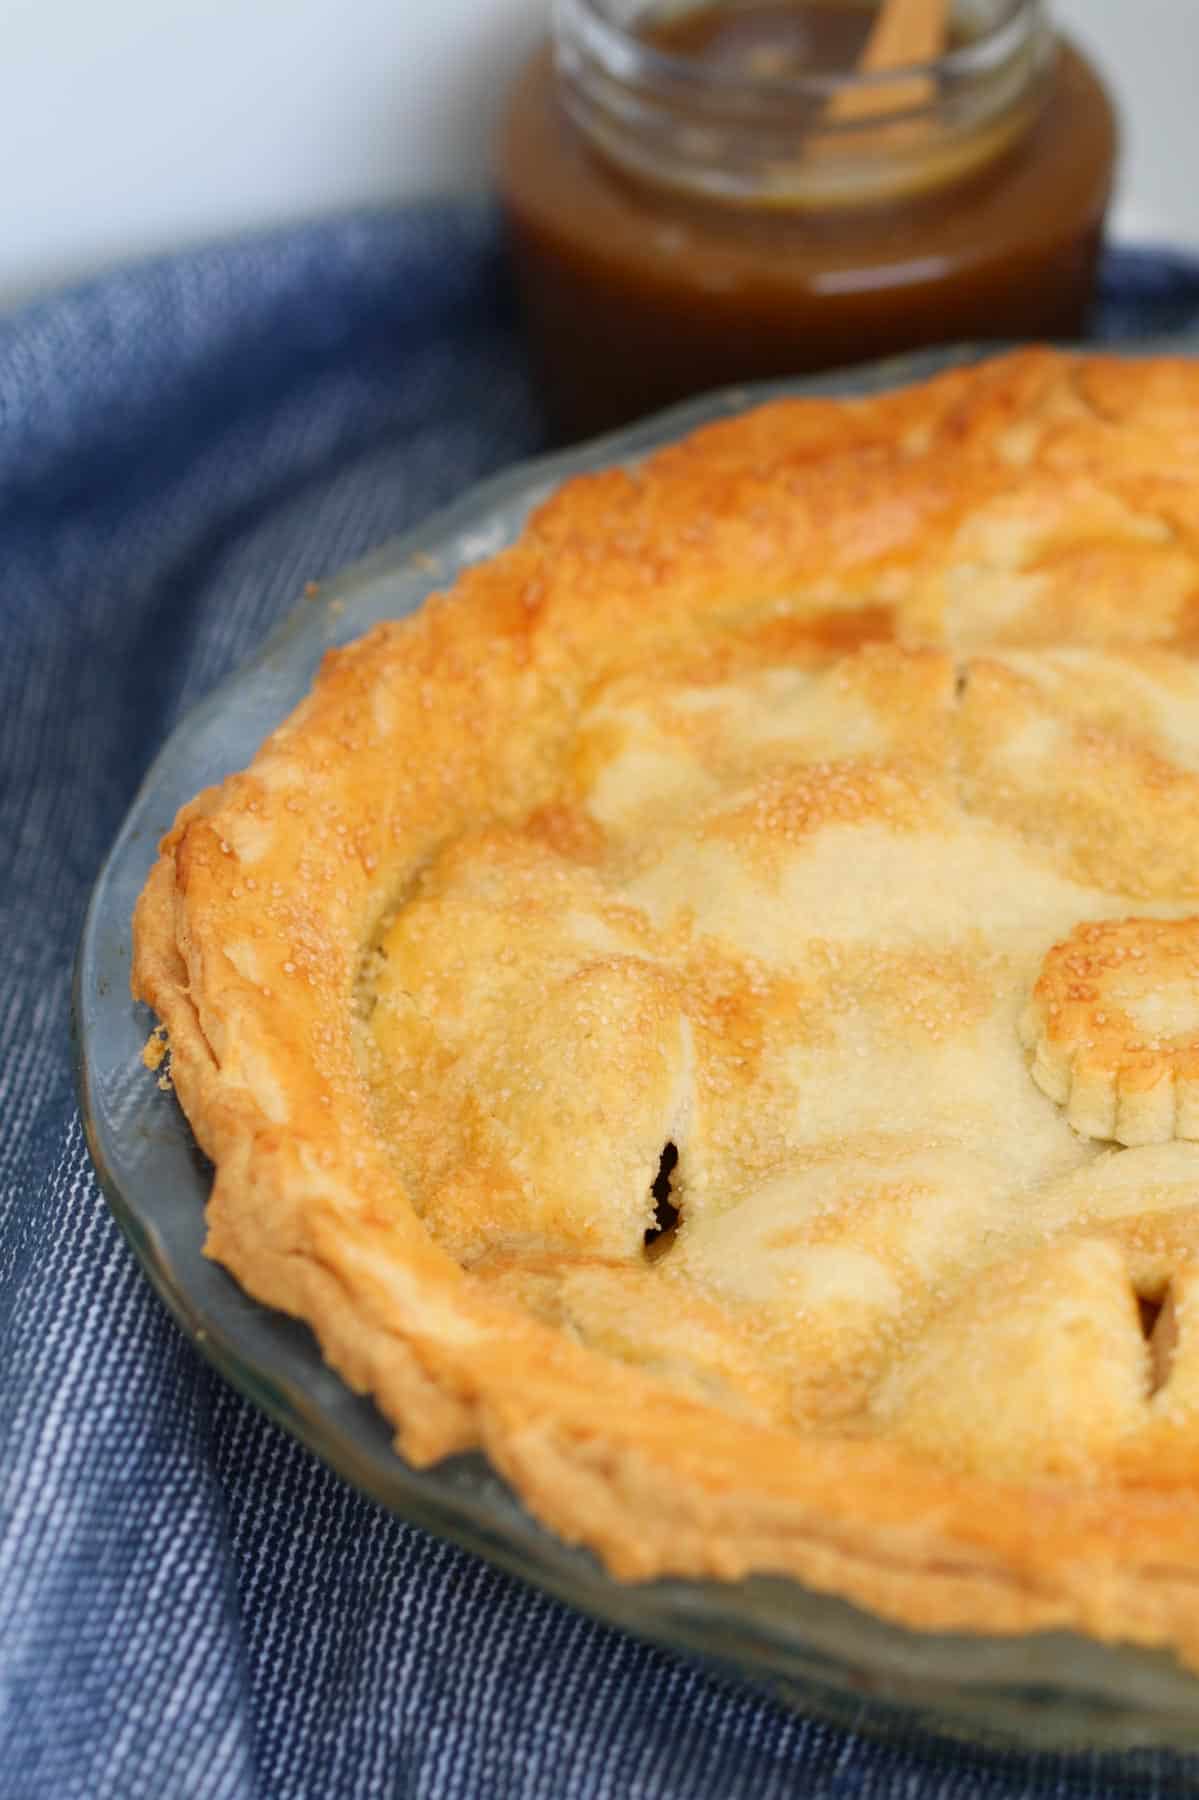
- Step 4: Finish - brush with egg wash, sprinkle with sugar and cut a few slits with a sharp knife to act as vents.
Bake - 190°C for 30-40 minutes until golden and crisp.
Top Tip
Always chill your pastry before rolling - it bakes up extra flaky, holds its shape beautifully, and gives you the perfect homemade pie crust.
Recipe Tips
- Granny Smith apples = best balance of sweet/tart.
- Drain apples well before adding to avoid soggy pastry.
- Don't skip the egg wash - golden colour + crisp crust.
- Raw sugar on top adds crunch.
- Cut slits in the top pastry to let steam escape - or cut the pastry into strips and weave a classic lattice crust for a traditional look.
- Serve with a scoop of vanilla ice cream, custard or cream.
- Store leftovers in the fridge for 3 days.
- Freeze slices or a whole pie (well wrapped) for up to 3 months.
- Reheat in the oven, not the microwave, to keep the pastry crisp.
Easy Apple Pie FAQs
Granny Smith are the classic choice as they're firm, tart apples that are perfect for baking. However, you can use any other variety such as Golden Delicious, Fuji, Honeycrisp, Royal Gala or Pink Lady.
No! This recipe is designed to bake perfectly without blind baking.
Yes - assemble and chill unbaked pie for 24 hours, or bake and store in the fridge for 3 days.
Use defrosted sheets of store-bought shortcrust pastry for the base and puff pastry for the top - it's an easy apple pie recipe with store-bought crust that still tastes homemade.
More Winter Dessert Recipes
If you loved this easy apple pie recipe, try these next:

WANT EVEN MORE DELICIOUS RECIPES? Subscribe to my newsletter or follow along on Facebook or Instagram. And if you love baking, then please come and join my Facebook cooking club group or subscribe to my YouTube channel.
Easy Apple Pie
Ingredients
For the pastry:
- 300 g (2 cups) plain flour
- 45 g (3tbs) caster sugar
- 150 g butter chopped
- 2-3 tbs ice cold water
For the filling:
- 7-8 apples peeled, or 800g canned pie apple (see notes)
- 2 tbs water only for conventional method
- 70 g (⅓ cup) raw sugar
- 1 tbs lemon juice
- 1 teaspoon cinnamon
- 1 egg lightly beaten
- 3 tbs raw sugar for sprinkling
Instructions
Conventional Method
- To make the pastry, place the flour, sugar and butter into a food processor and process it until it resembles fine breadcrumbs.
- Slowly add the iced water and mix until a smooth dough forms. Knead the dough into a ball on a lightly floured surface.
- Wrap in plastic wrap and place it into the fridge for a minimum of 30 minutes. If using store-bought pastry sheets, place them onto the bench to defrost.
- Preheat oven to 190 degrees celsius (180 if using fan forced). Grease a 24cm pie dish and set aside.
- Meanwhile, place the apples and water into a saucepan over medium high. Stir occasionally for 5 minutes or until the apple has just started to soften.
- Mix through the sugar, lemon juice and cinnamon.
- Divide dough into 2 portions (one ⅔ for the base and one ⅓ for the top) and then roll out each portion until 3-5mm thick.
- Place the larger piece of pastry over the pie dish and press down so that it covers the base and sides. Trim any excess.
- Drain any excess liquid from the apple mixture. Add the apple mixture to the pie dish and spread out evenly.
- Place the smaller piece of pastry over the apples, and crimp the edges lightly with your fingertips to seal around the rim of the dish.
- Brush the lightly beaten egg over the top of the pie. Sprinkle over the raw sugar (optional).
- Cut a 3-4 slits into the top of the pastry.
- Bake in the oven for 30-40 minutes or until the pie pastry is lightly golden and crispy.
Thermomix Method
- To make the pastry, place the flour, sugar and butter into the Thermomix bowl and mix for 10 seconds on Speed 6 (or until it resembles fine breadcrumbs). Add the iced water and knead for 2 minutes on Interval speed.
- Knead the dough into a ball on a lightly floured surface, wrap in plastic wrap and place into the fridge for at least 30 minutes. If using store-bought pastry sheets, place them onto the bench to defrost.
- Preheat oven to 190 degrees celsius (180 if using fan forced). Grease a 24cm pie dish and set aside.
- Place the apple slices into the Varoma dish. Fill the Thermomix bowl with 500g water and cook for 15 minutes, Varoma temperature, Speed 2.
- Sprinkle over the sugar, lemon juice and cinnamon and mix to combine.
- Divide the dough into 2 portions (one ⅔ for the base and one ⅓ for the top) and then roll out each portion until 3-5mm thick.
- Place the larger piece of pastry over the pie dish and press down so that it covers the base and sides. Trim any excess.
- Drain any excess liquid from the apple mixture. Add the apple mixture to the pie dish and spread out evenly.
- Place the smaller piece of pastry over the apples, and crimp the edges lightly with your fingertips to seal around the rim of the dish.
- Brush the lightly beaten egg over the top of the pie. Sprinkle over the remaining raw sugar (optional).
- Cut 3-4 slits into the top of the pastry.
- Bake in the oven for 30-40 minutes or until the pie pastry is lightly golden and crispy.
Notes
- Granny Smith apples = best balance of sweet/tart.
- Drain apples well before adding to avoid soggy pastry.
- Don't skip the egg wash - golden colour + crisp crust.
- Raw sugar on top adds crunch.
- Always chill your pastry before rolling - it bakes up extra flaky, holds its shape beautifully, and gives you the perfect homemade pie crust.
- Cut slits in the top pastry to let steam escape - or cut the pastry into strips and weave a classic lattice crust for a traditional look.
- Serve with a scoop of vanilla ice cream, custard or cream.
- Store leftovers in the fridge for 3 days.
- Freeze slices or a whole pie (well wrapped) for up to 3 months.
- Reheat in the oven, not the microwave, to keep the pastry crisp.


E.L.M Tree says
LOVED IT! We had an overstock of apples so I decided to make apple pie for me and my family of two sisters, mum & dad, and a baby brother. Delicious stuff this is! I've bookmarked this page and looking forward to another bite! 🙂
Lucy says
Yay! I'm so thrilled to hear that!
Vera says
Can I make party without a food processor? I'm not keen on buying the pastry already made and I don't have a food processor.
Lucy says
Absolutely!!! You can definitely make your own pastry by hand!
Esther says
I followed the TX version of the recipe and other than having to add a bit more water to the pastry it turned out perfectly. We like our apple a little firmer so will reduce steaming time a little, next time. Thanks for the easy-to-follow recipe and instructions. Will be making again!
Lucy says
That's fantastic! Thank you so much!
malcolm webster says
oven temp would be helpful please.
malcolm webster says
yes ive just spotted the temp.....its 190
Lucy says
Hi Malcolm, all the info you need (including the oven temp) is in the printable recipe card - you can either scroll to the bottom or click 'jump to recipe' to find it. Good luck with your pie!
Kate says
I have made this recipe twice this week! It is so easy and so amazing. The second time I omitted the cinnamon as my husband doesn’t like cinnamon. And it is still amazing! Thank you for sharing!
Lucy says
Oh that's fantastic!! Thank you so much!
Leisa says
Hi just wondering do you use salted butter or unsalted?
Lucy says
Either is fine!