

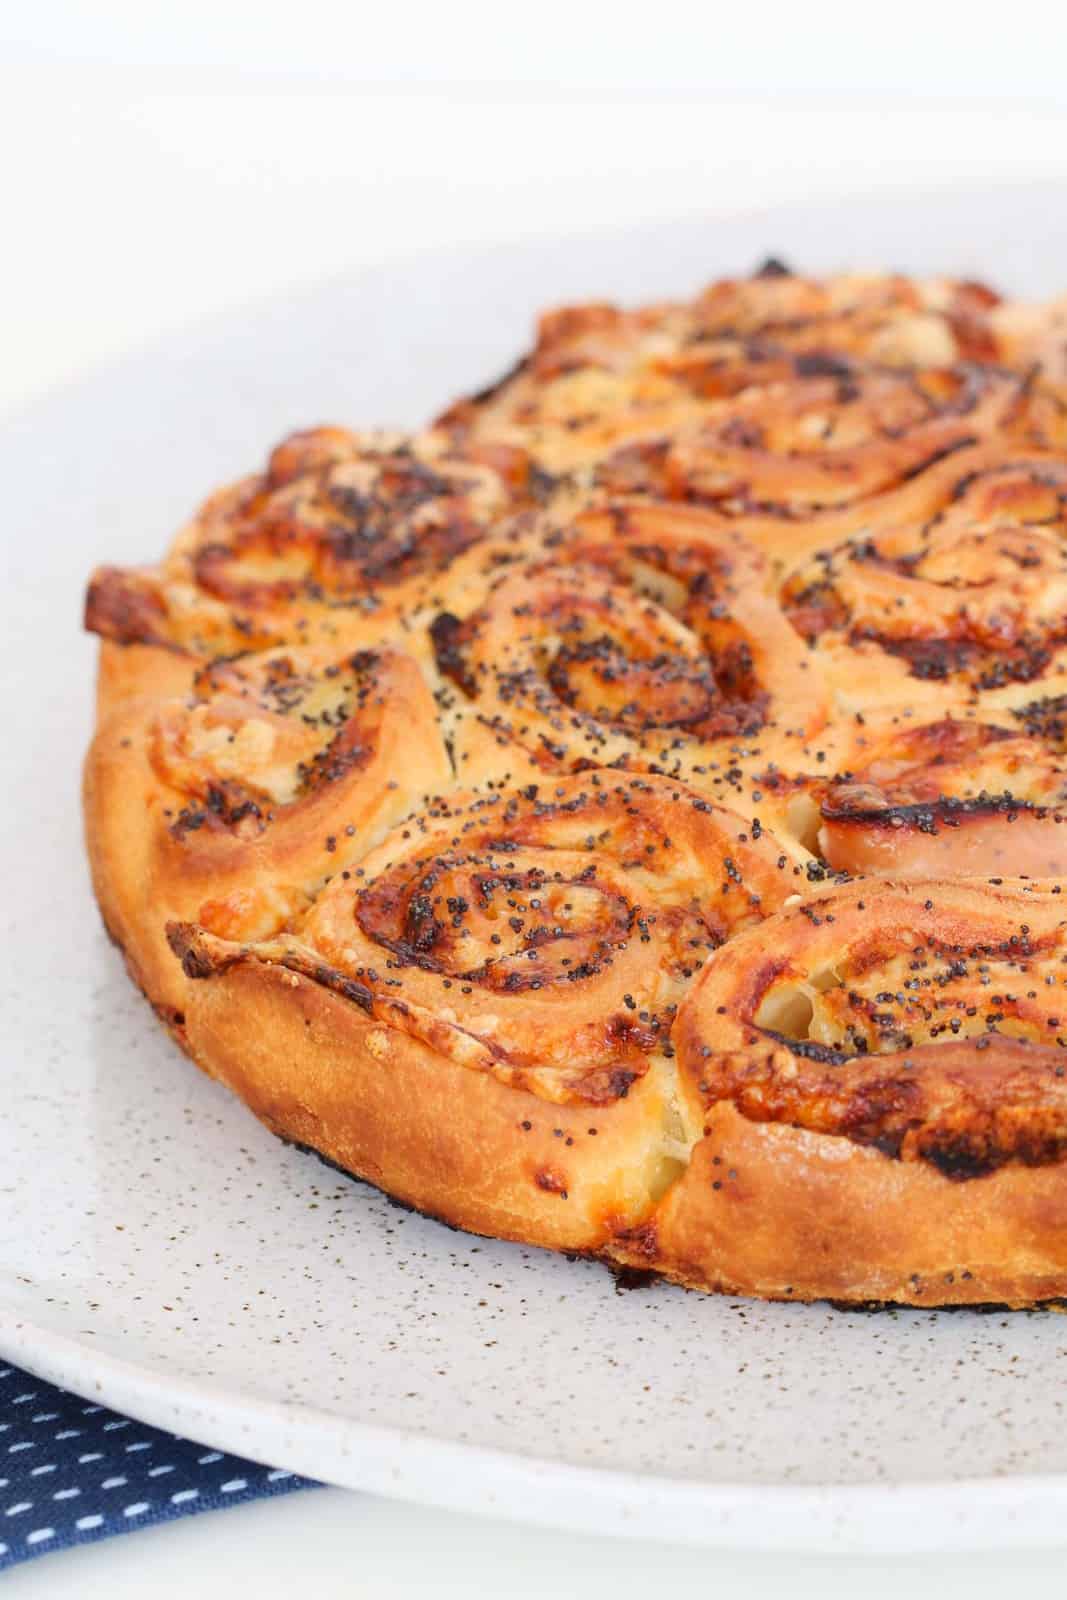
Kid-approved Ham and Cheese Scrolls that will be ready to eat in just 30 minutes! Made from 6 basic ingredients, these savoury scrolls are freezer-friendly, perfect for lunchboxes, picnics and weekend lunches.

I like having a variety of freezer-friendly food in my freezer at all times. I usually have Cheese and Vegemite Scrolls or Pizza Scrolls, Homemade Sausage Rolls, Nut-Free Muesli Bars, Condensed Milk Cookies and Butter Cake in my stash.
Packing frozen snacks into the lunchbox for the next day, and having them defrost overnight in the fridge is part of our evening routine. That leaves just the fruit to cut and the drink bottle to find and fill in the mornings!
Why You're Going To Love This Recipe
These Ham and Cheese Scrolls are full of flavour, and are a quick and easy way to have lunch ready for those busy school mornings!
"Best dough recipe that I've tried." "So easy to make and super yummy."
No Proving Time - Since there is no yeast in this dough, there is no resting or proving time required with this recipe.
Versatile - You can substitute the mayonnaise for sauce or pesto and the ham for any cold meat that you prefer.
Budget friendly - Made with pantry staples and other simple ingredients, this makes a good sized batch of scrolls without breaking the bank.
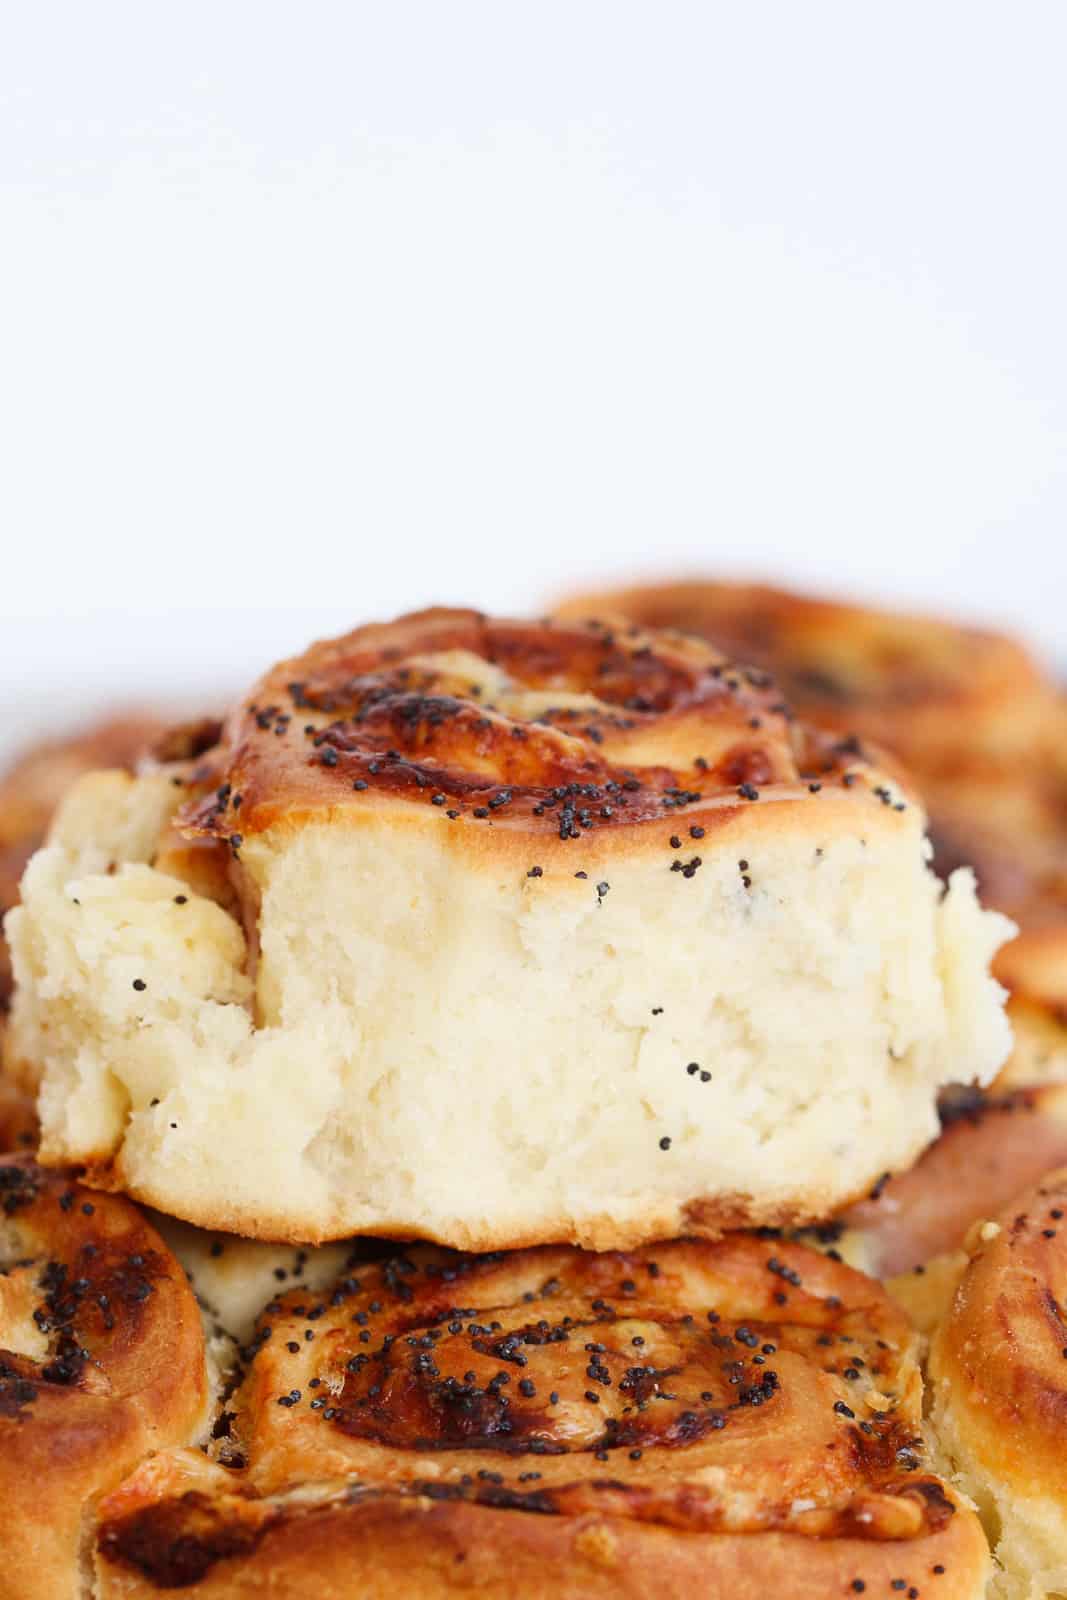
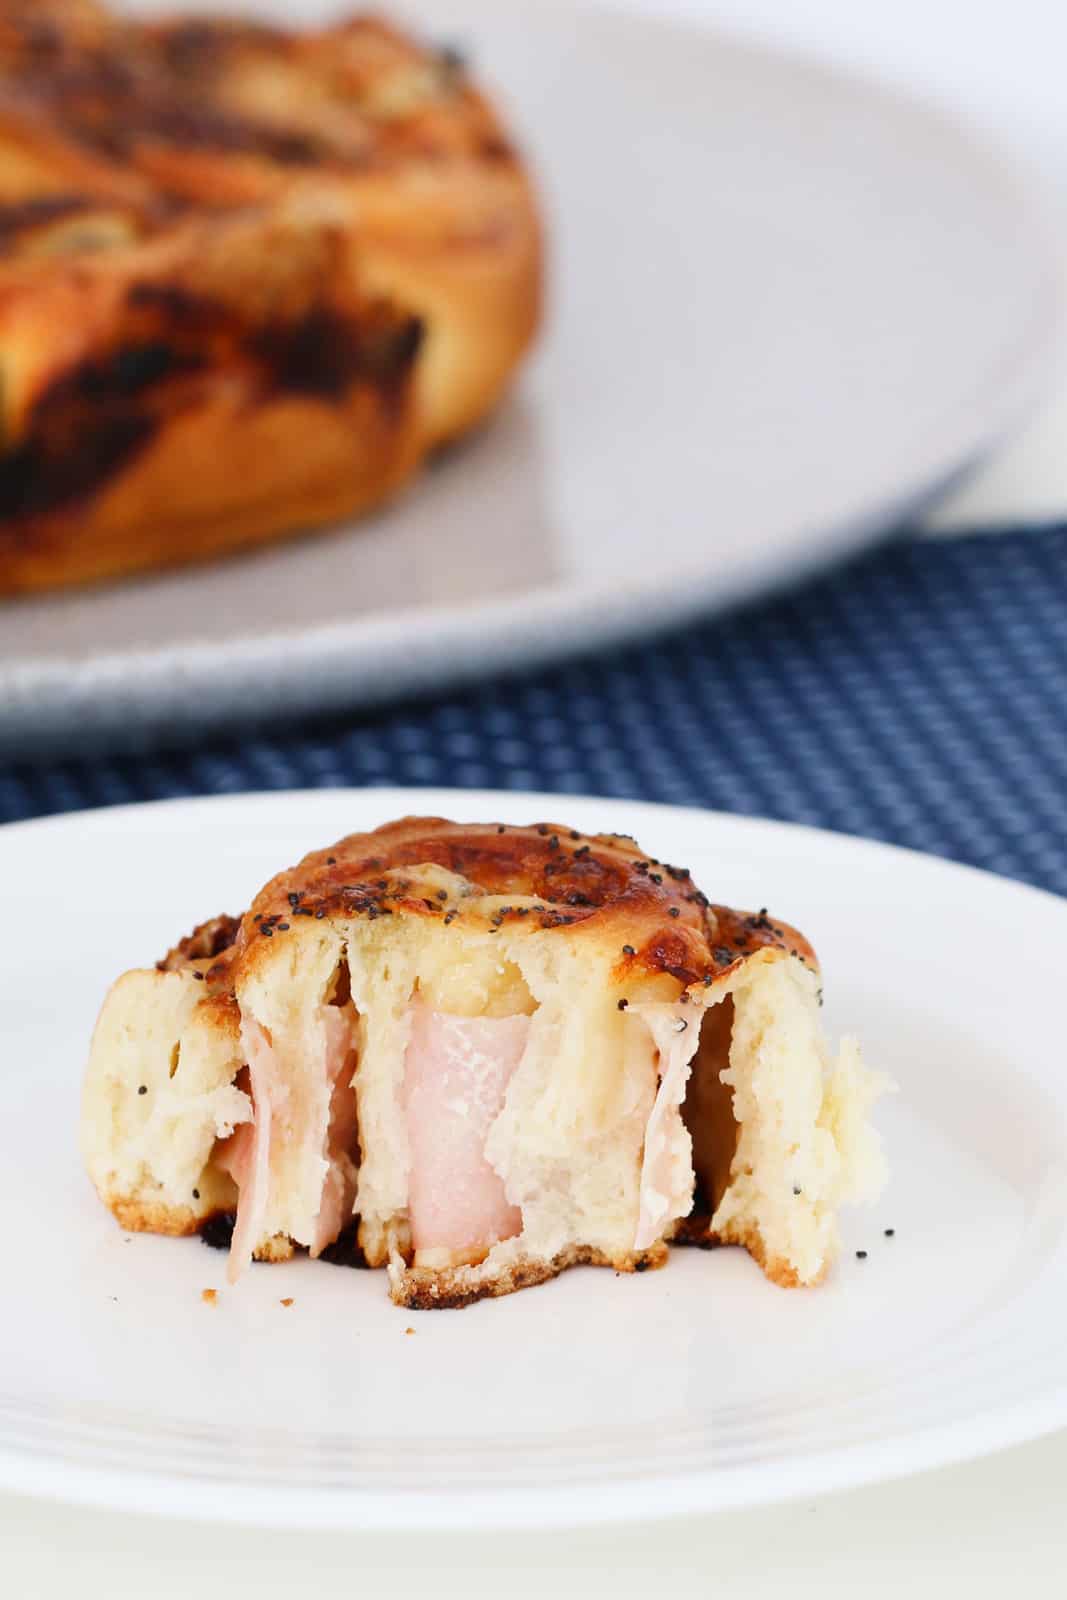
Mess-Free - With the ham and cheese neatly rolled up inside, there is less chance of the fillings falling out. Perfect for little hands at lunchtime.
What You Need
Note: Scroll to the recipe card at the bottom for the ingredients, quantities and full detailed method.

Butter - I prefer to use unsalted butter as a baking ingredient. This is not essential and if you usually buy salted butter, using that will be perfectly fine. The butter should be straight from the fridge and used while as cold as possible.
Self-Raising Flour - Also known as self-raising flour, this is a blend of plain (or all-purpose) flour, and a raising agent. You can make your own by adding 2 teaspoon baking powder to every 1 cup plain flour.
Milk - I buy and use full-fat or full-cream milk, as it really does make a difference to the texture.
Mayonnaise - I recommend that you opt for a whole-egg mayonnaise. I find this will have the best flavour and will really complement the ham and cheese.
Ham - My preference is to use shaved, or very thinly sliced, ham for making Ham and Cheese scrolls. The thinner slices make rolling the dough into a log a bit easier!
Cheddar Cheese - One of the more commonly bought blocks of cheese is "Tasty" cheese. This is an aged cheddar cheese, perfect as an everyday cheese and as an ingredient in these scrolls.
Poppy Seeds - These are not essential, but I highly recommend adding them. They do have a subtle flavour and they add a bit of texture to the scrolls as well!
Step By Step Instructions
You'll never want a store-bought Ham and Cheese Scroll again after tasting your own homemade version!
Note: Scroll to the recipe card at the bottom for the ingredients, quantities and full detailed method.
Step 1 - Make The Dough
Place the sifted self-raising flour and roughly chopped butter into a mixing bowl, or the Thermomix bowl.
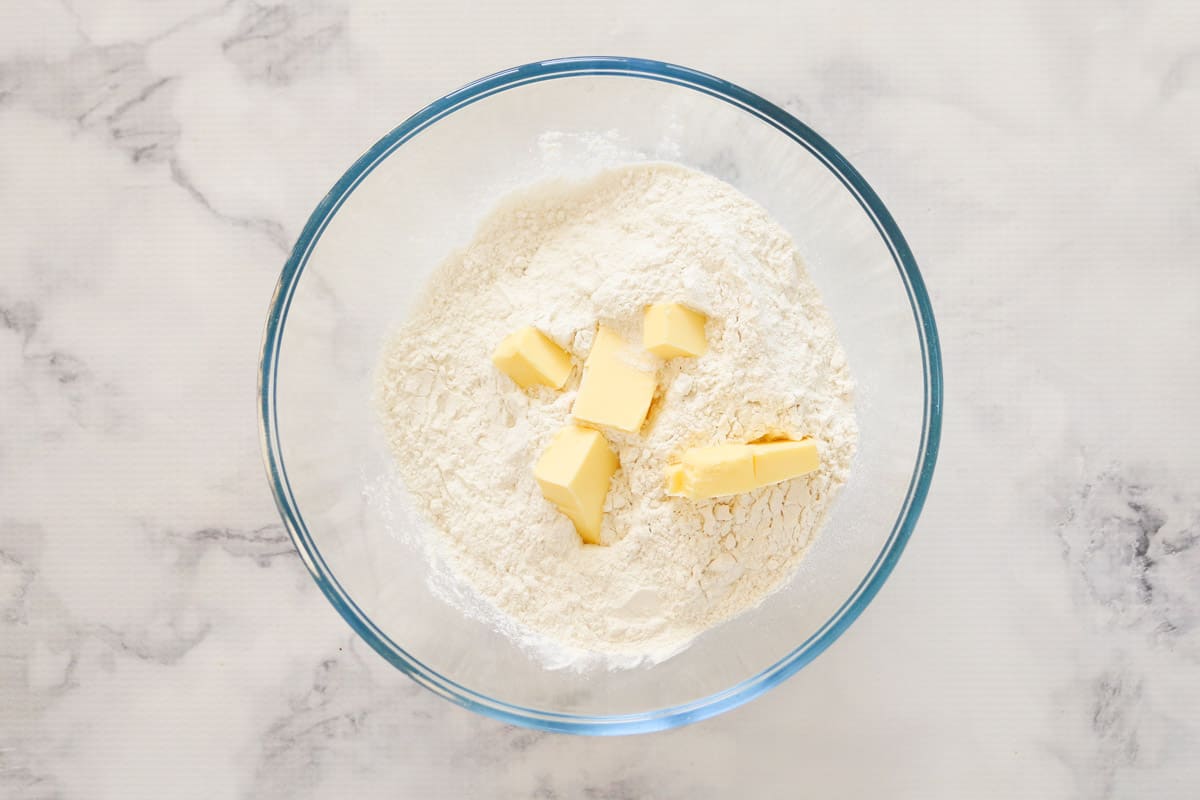
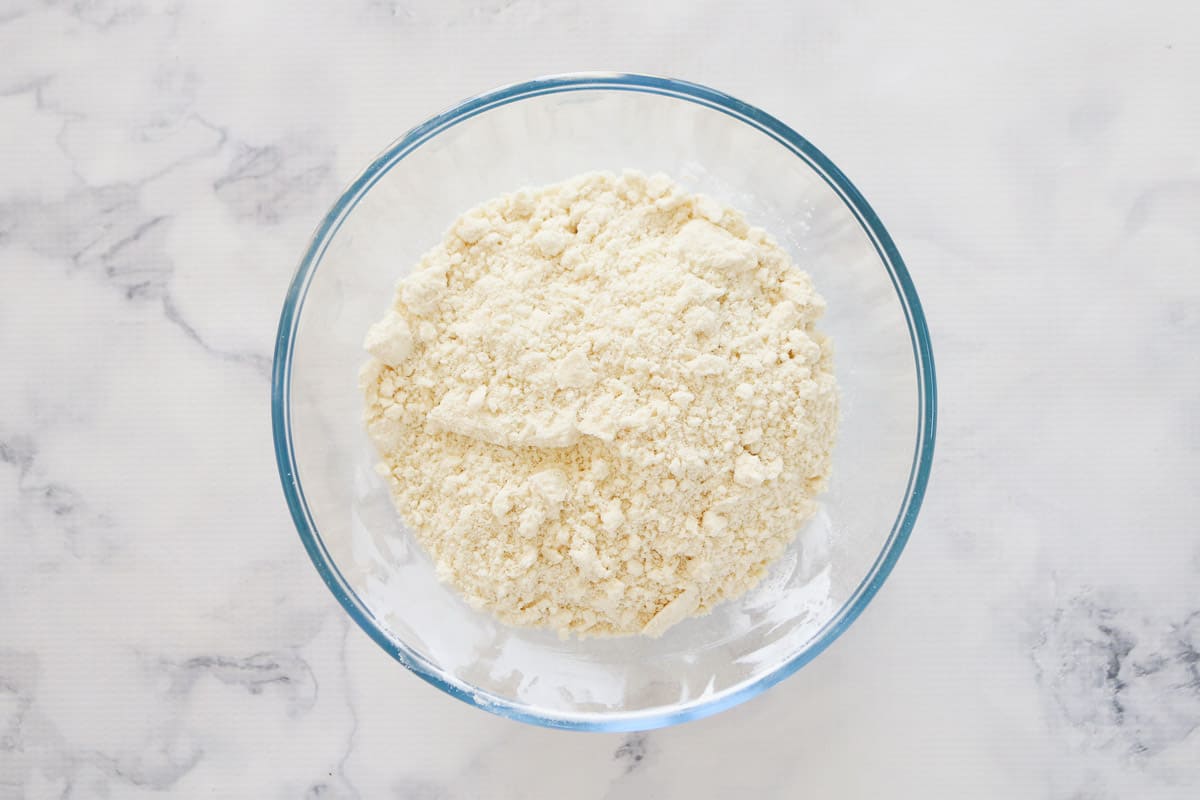
Rub the butter into the flour until it resembles breadcrumbs.
Add the milk to the self-raising flour and butter mixture.
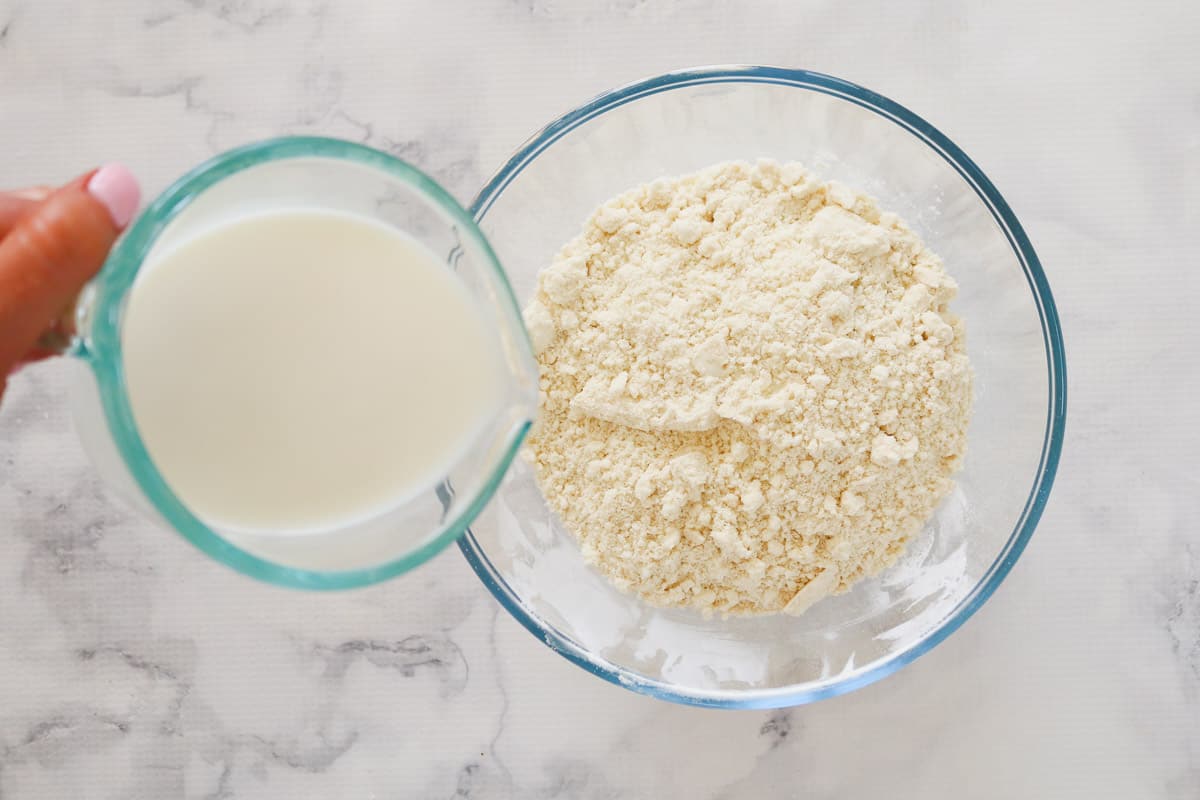
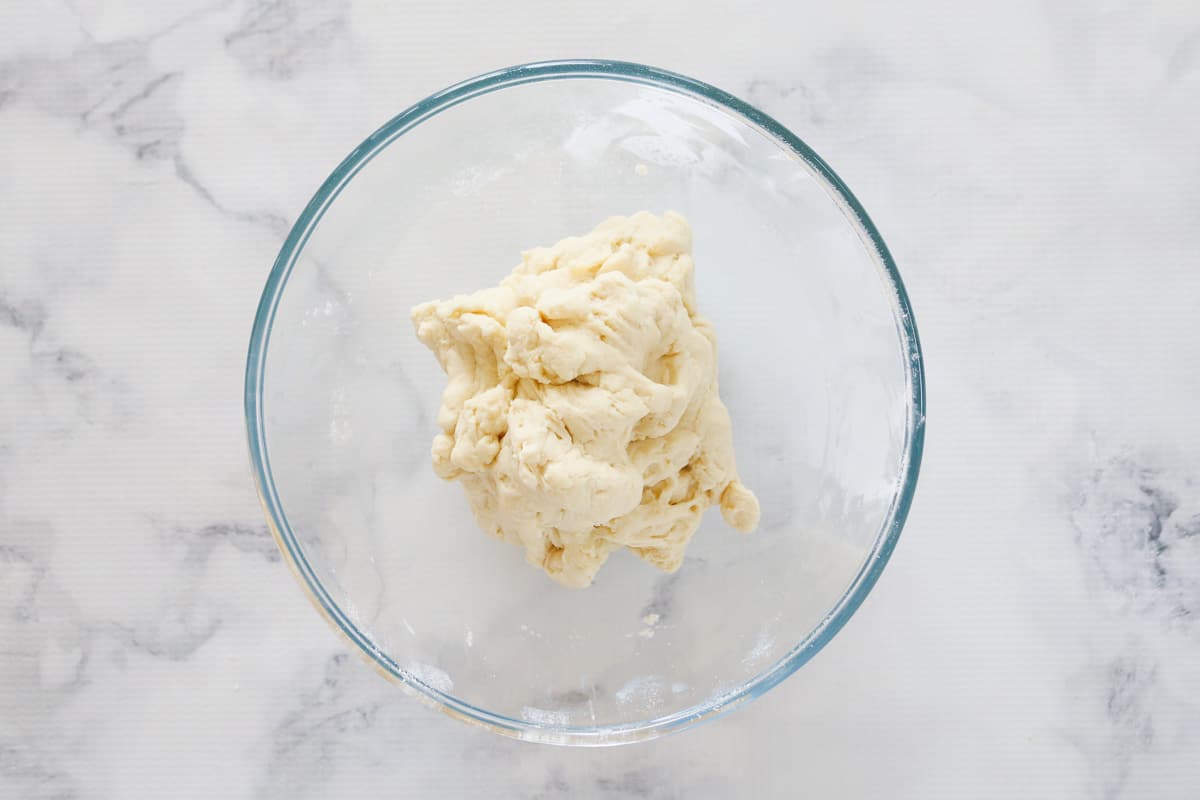
Mix the ingredients together until a dough is formed and knead gently until smooth.
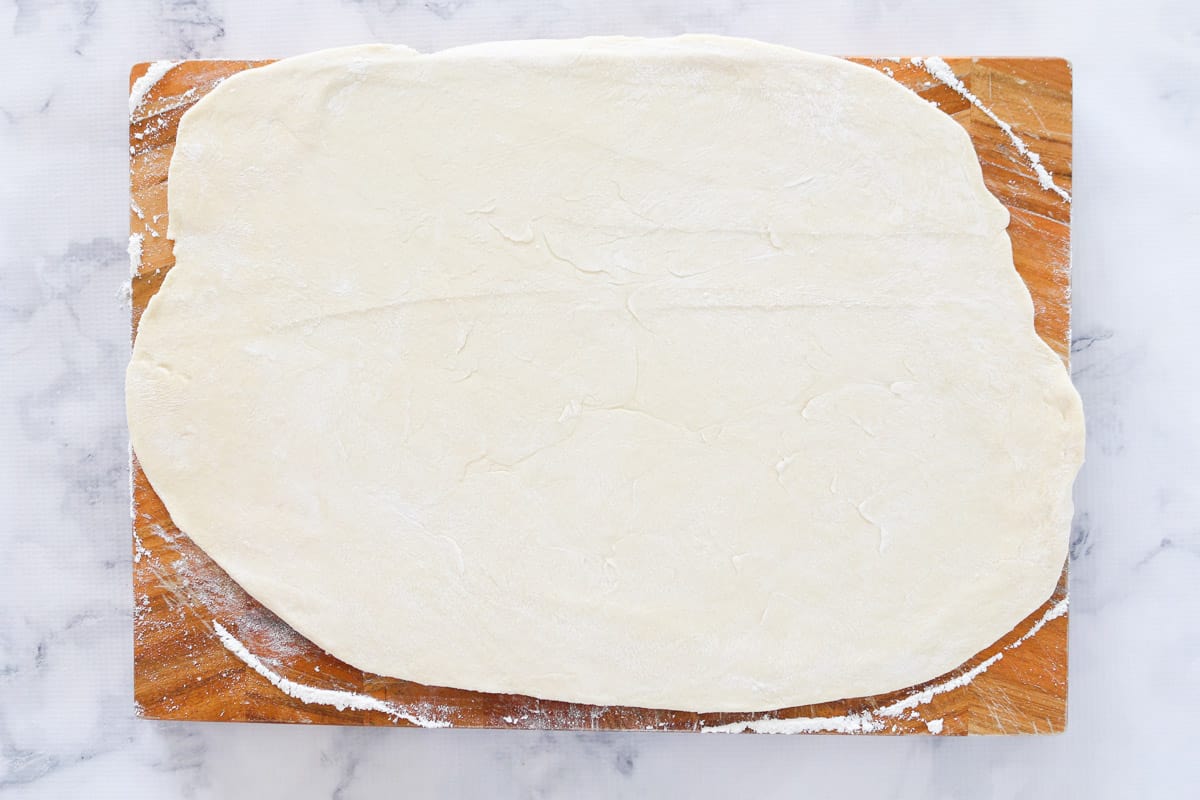
Roll the dough out into a rectangle on a lightly floured board.
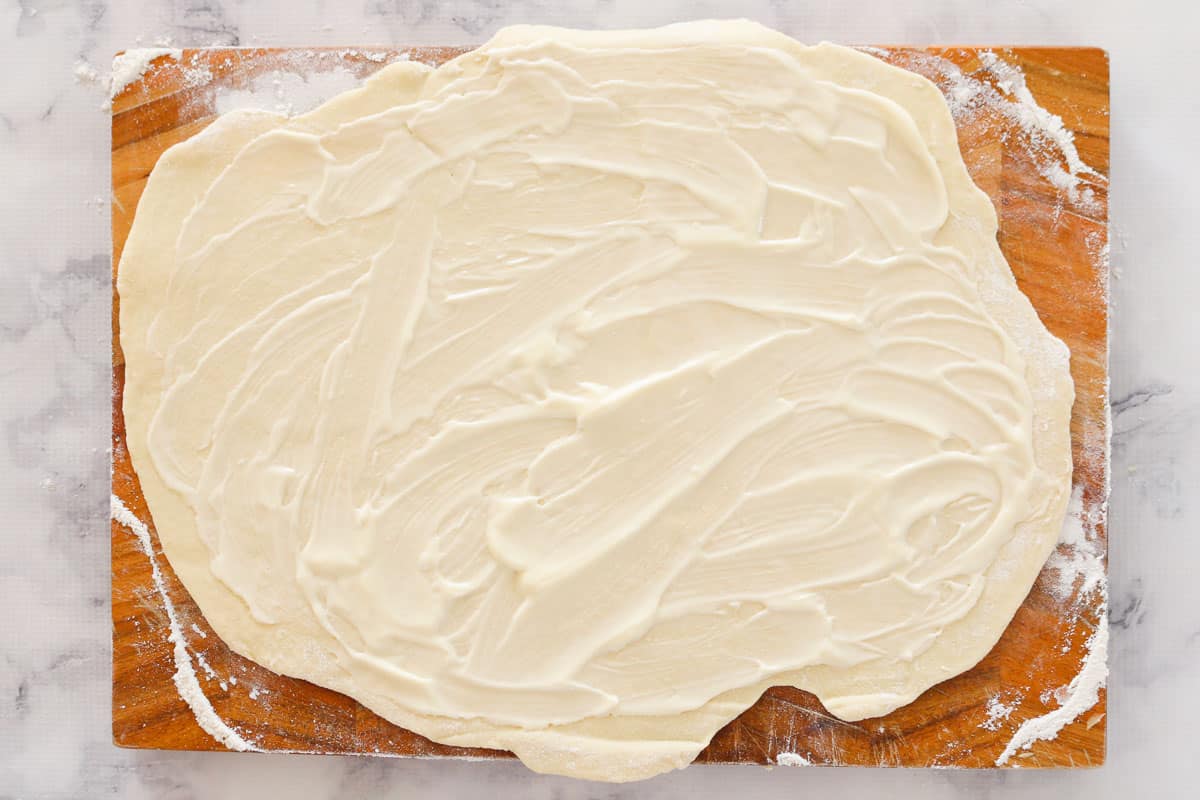
Step 2 - Add The Fillings
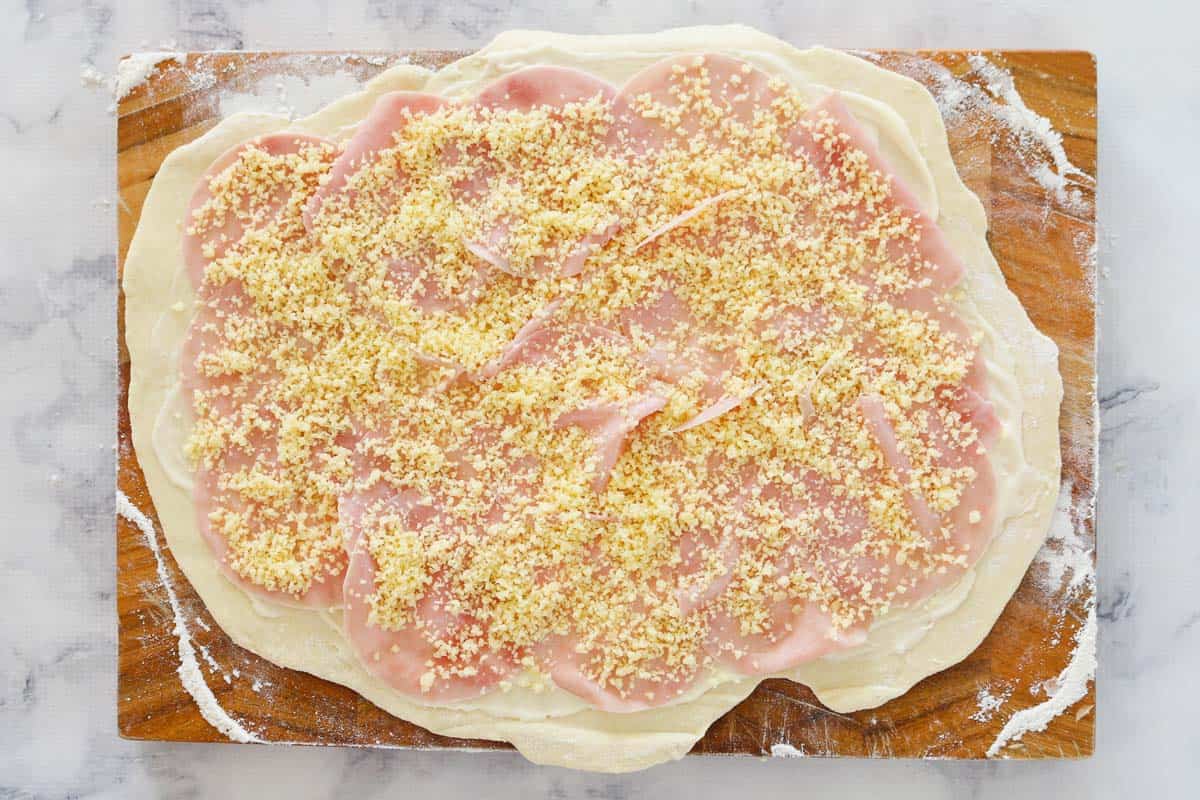
Spread the mayonnaise over the dough.
Lay the slices of ham, slightly overlapping, over the mayonnaise and sprinkle with grated cheese.
Step 3 - Form The Scrolls
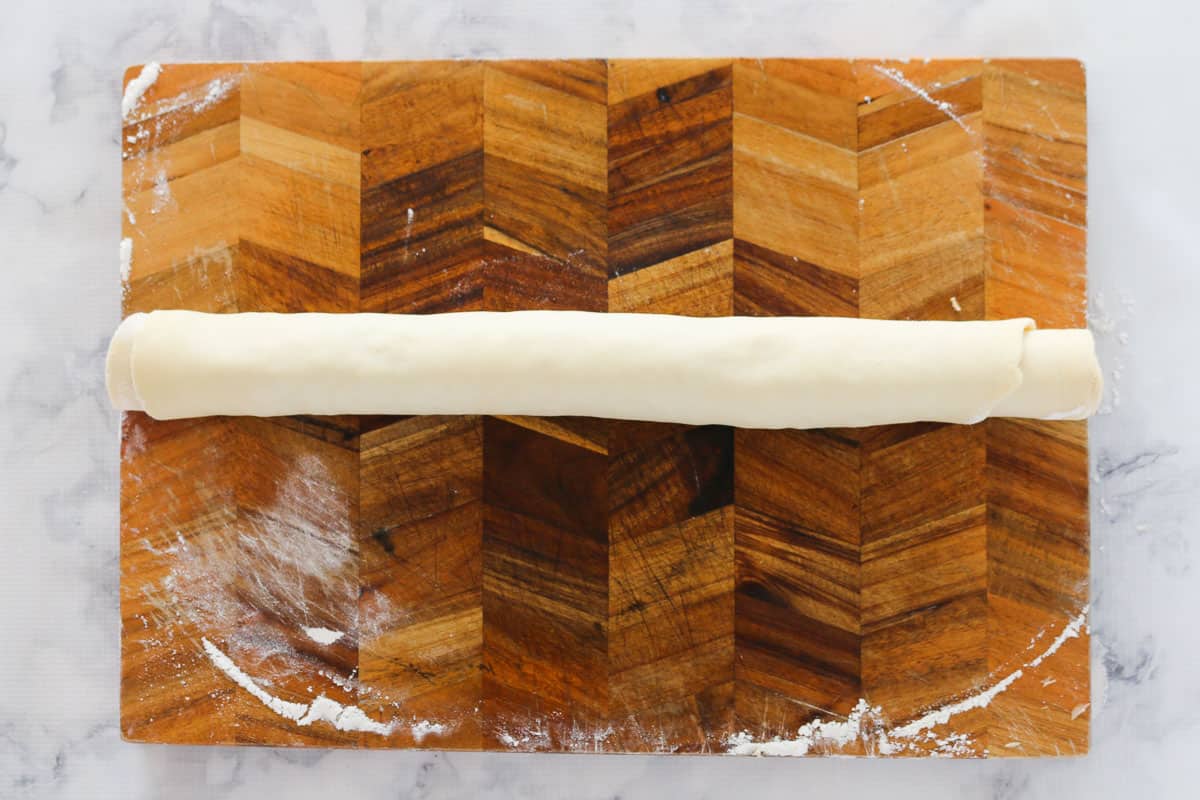
Roll the dough up into a log, starting from the long edge.
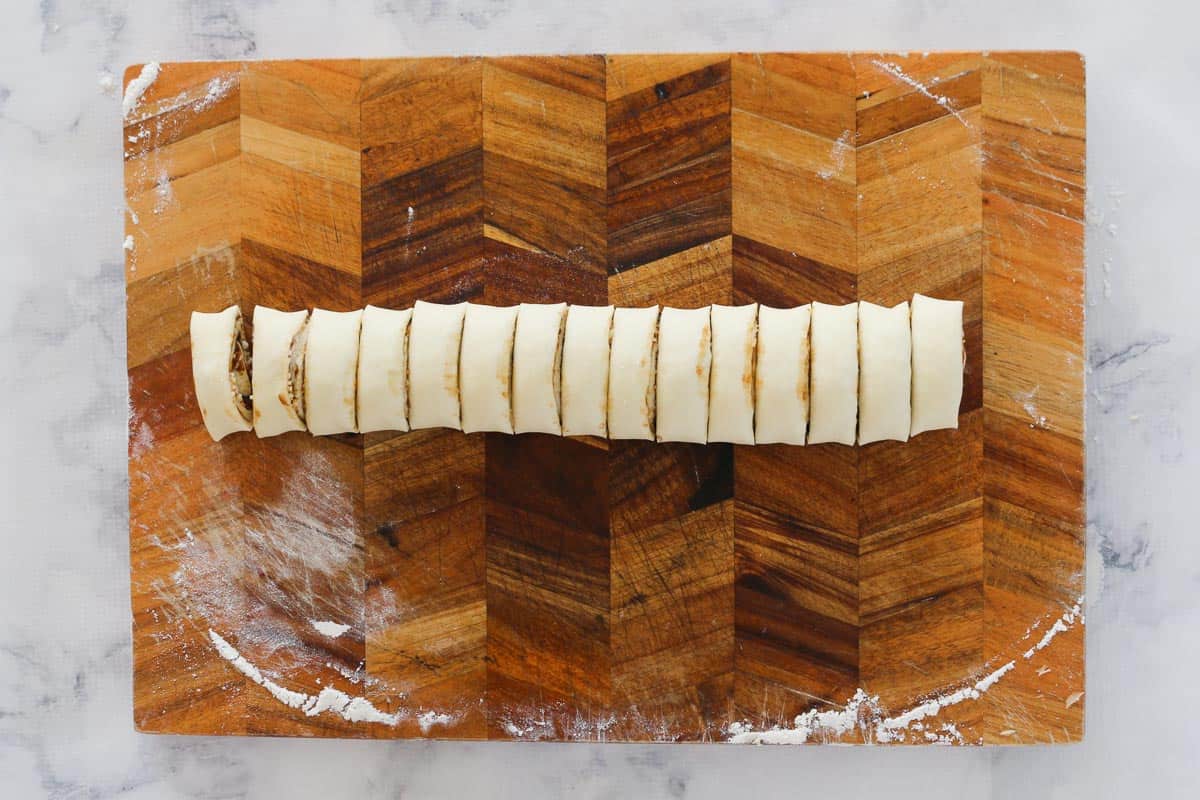
Use a sharp knife to cut the dough into 3-4 cm wide slices
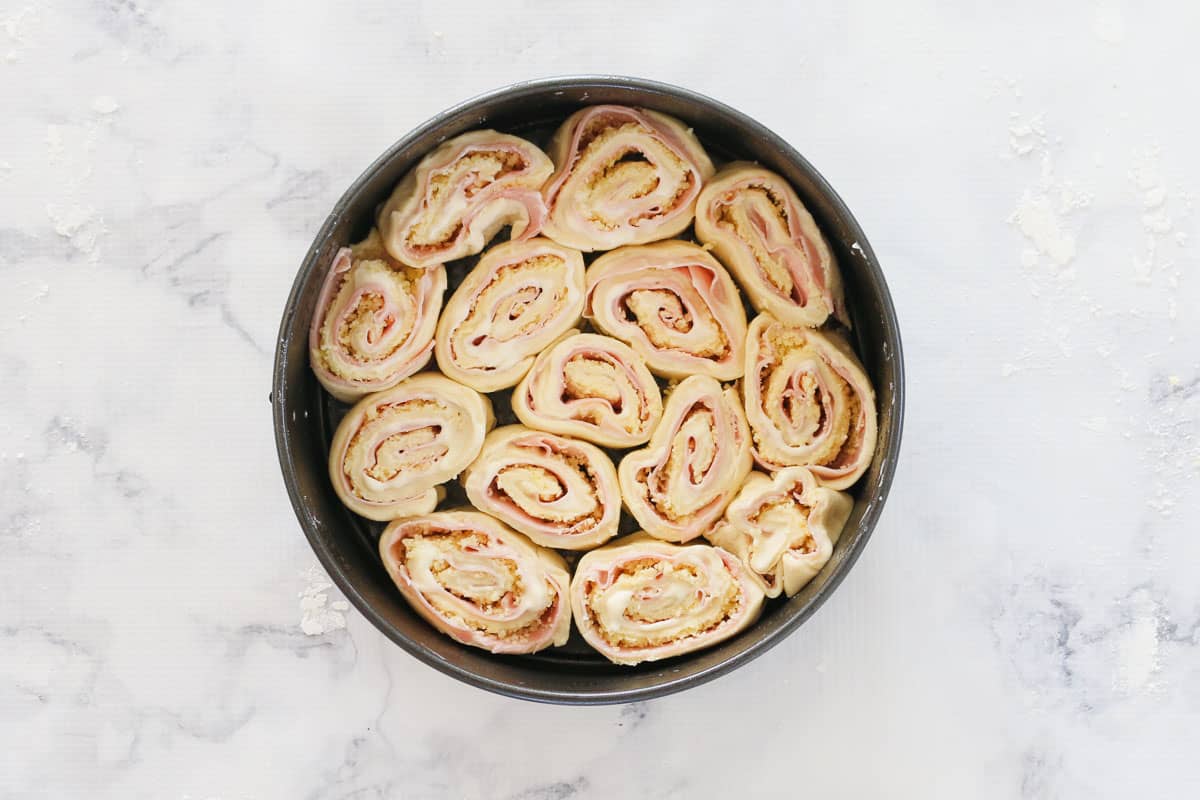
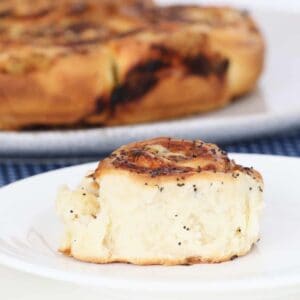
Arrange the scrolls into the prepared baking tin and sprinkle with poppy seeds (optional).
Bake in a preheated oven for about 15-20 minutes, or until golden.
Leave in the tin for 10 minutes to cool slightly.
These scrolls are delicious warm, so once they are cool enough to have a taste, make sure you do!
If your batch of Ham and Cheese Scrolls are destined for the freezer, cool completely on a wire rack before storing.
Expert Tips and FAQs
I like to bake the scrolls in a round cake tin that has been greased and lined with baking paper, preferably a springform tin.
When baked in an enclosed tin, the edges of the Ham and Cheese Scrolls stay lovely and soft. The outer edge of the outside scrolls will be slightly crustier than those on the inside, but they will still have a softer finish than if baked on a flat tray.
Yes, you can definitely use a flat baking tray that has been greased and lined with baking paper. Place the scrolls on the tray with a little room to spread, but don't leave too big a gap between them.
I highly recommend using baking paper, even in a non-stick baking tin, as the cheese melts during baking and can make the scrolls stick to the base of the tin.
You can use any condiment you prefer. The Ham and Cheese Scrolls taste just as good with tomato or barbecue sauce, wholegrain mustard, relish or pesto.
Any thinly sliced or shaved cold meat would work well as a substitute in these scrolls. A mild salami would be a tasty option!
The scrolls can be stored in a refrigerated, airtight container for up to 2 days. Alternatively, they can be frozen, in an airtight container, or resealable bags, for up to 3 months.
More Savoury Lunchbox Recipes
If you're looking for more savoury, freezer-friendly lunchbox recipes, these are some of my other kid-approved recipes:
Healthy Ham, Cheese and Zucchini Muffins - With the added goodness of zucchini, these savoury muffins can be made into mini muffins or regular size to cater for different appetites!
Cheesy Corn Fritters - These delicious little morsels are just as good served cold, and made into small, pikelet-sized fritters, make a terrific lunchbox snack.
Healthy Sweet Potato & Zucchini Nuggets - Nuggets in a lunchbox are almost a treat food, and with the goodness of vegetables in a tasty little snack, you can be sure that these will be eaten!
Chicken and Vegetable Sausage Rolls - These are a tasty and healthier alternative to traditional sausage rolls. Make them into party-sized rolls to fit into any lunchbox as a perfect snack!
WANT EVEN MORE DELICIOUS RECIPES? Subscribe to my newsletter or follow along on Facebook or Instagram. And if you love baking, then please come and join my Facebook cooking club group or subscribe to my YouTube channel.
Ham and Cheese Scrolls
Ingredients
- 300 g (2 cups) self-raising flour
- 30 g butter chilled, roughly chopped
- 180 g (¾ cup) milk
- 75 g (¼ cup) mayonnaise
- 150 g ham shaved or thinly sliced
- 80 g cheddar cheese
- 2 tbs milk extra
- poppy seeds, for sprinkling optional
Instructions
Conventional Method
- Preheat oven to 200 degrees Celsius (fan-forced). (See notes)
- Grease and line a 23cm round, springform baking tin with baking paper, and set aside until needed.
- Sift the self-raising flour into a bowl.
- Add the butter and rub into the flour until the mixture resembles breadcrumbs.
- Add the milk and mix gently until the mixture forms a dough.
- Knead the dough, on a lightly floured cutting board, until smooth.
- Roll the dough into a long rectangular shape, about 1 cm thick.
- Spread the mayonnaise over the dough.
- Lay the shaved ham, overlapping slightly, over the mayonnaise.
- Grate the cheese before sprinkling it over the layer of ham.
- Starting from the long edge of the rectangle, roll the dough into a log.
- Using a sharp knife, cut the roll into 3-4 cm slices.
- Place the slices, cut side up, into the prepared tin.
- Brush the extra milk over the scrolls with a pastry brush.
- Sprinkle over the poppy seeds, if using.
- Bake for 15-20 minutes or until golden. The scrolls will sound hollow when tapped once baked.
- Leave the scrolls to cool in the tin for 10 minutes. Transfer to a wire rack to cool completely.
Thermomix Method
- Preheat oven to 200 degrees Celsius (fan-forced). (See notes)
- Grease and line a 23cm round, springform baking tin with baking paper, and set aside until needed.
- Weigh the self-raising flour and butter into the Thermomix bowl. Mix for 6 seconds, Speed 6.
- Add the milk and knead for 2 minutes, Kneading Function.
- Transfer the dough to a lightly floured cutting board, and work it into a smooth ball.
- Roll the dough into a long rectangular shape, about 1 cm thick.
- Spread the mayonnaise over the dough.
- Lay the shaved ham, overlapping slightly, over the mayonnaise.
- Weigh the cheese, roughly chopped into cubes, into the Thermomix and grate for 8 seconds, Speed 8.
- Sprinkle the grated cheese over the layer of ham.
- Starting from the long edge of the rectangle, roll the dough into a log.
- Using a sharp knife, cut the roll into 3-4 cm slices.
- Place the slices, cut side up, into the prepared tin.
- Brush the extra milk over the scrolls with a pastry brush.
- Sprinkle over the poppy seeds, if using.
- Bake for 15-20 minutes or until golden. The scrolls will sound hollow when tapped once baked.
- Leave the scrolls to cool in the tin for 10 minutes. Transfer to a wire rack to cool completely.


Sarah says
Hi Lucy, I love your recipes and thermie conversions! Could these be prepared and stored in the fridge (uncooked) before being cooked in the oven the next day, or do you think they would go soggy? Thanks
Lucy says
Hmmm I think that should be ok!!
Samantha says
Can you freeze some of portions of just the dough or refrigerate them to use later?
Lucy says
Absolutely!
Catherine Kittelberger says
Made this today. I cooked rasher bacon , spinach, and onion first and top with cheese as fillings. Cut it into 8 pieces. Decent lunch portions.
Lucy says
Fantastic!
Karen says
I was shocked by how good these were for such a simple quick recipe. I added spring onion also 🙂
Lucy says
Thank you so much!
Bridgit says
I switched up the mayo for cream cheese and drizzled sweet chilli, spring onion and ham on top. I realised about 5 minutes in the oven I used regular flour and didn’t add any raising agents ♀️ So it was a fail for me this time round but at least I won’t make the same mistake next batch!!
Lucy says
Oh no!! Yes you definitely need self-raising flour or a raising agent!
Alyce says
Would it still taste ok if you left out the Mayo?
Lucy says
Absolutely! But make sure you sub it with butter or tomato/BBQ/sweet chilli sauce instead!