
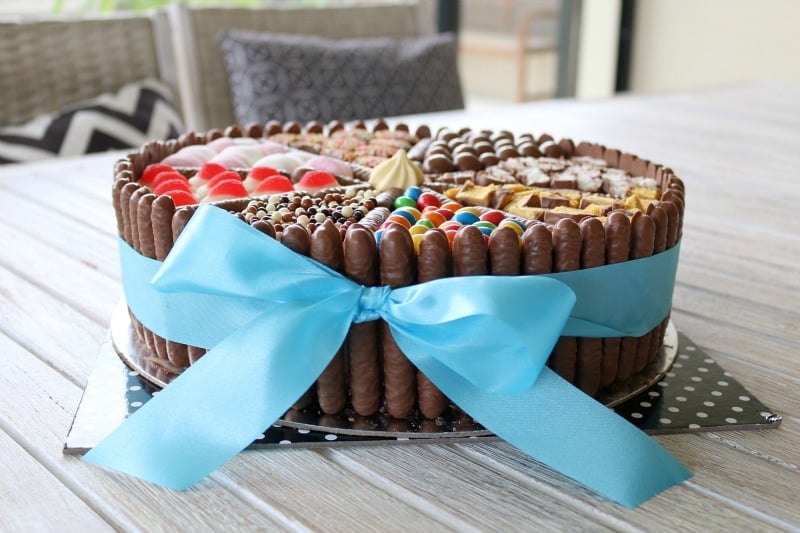
An easy chocolate fingers cake decorated with lollies, marshmallows and chocolates that's perfect for birthday parties!

When it comes to simple birthday cake decorating ideas, this has got to be the easiest (and yummiest!).
Whether you're planning a birthday party or just need a showstopper of a cake for a special occasion, a chocolate fingers cake is the answer!
What You Need
Chocolate mud cake - you can either follow my delicious fudgy chocolate mud cake recipe (see recipe card below) or you can use a store-bought chocolate cake
Chocolate frosting - again, you can either use my rich and creamy chocolate frosting recipe (see recipe card below) or you can use a tub of store-bought frosting.
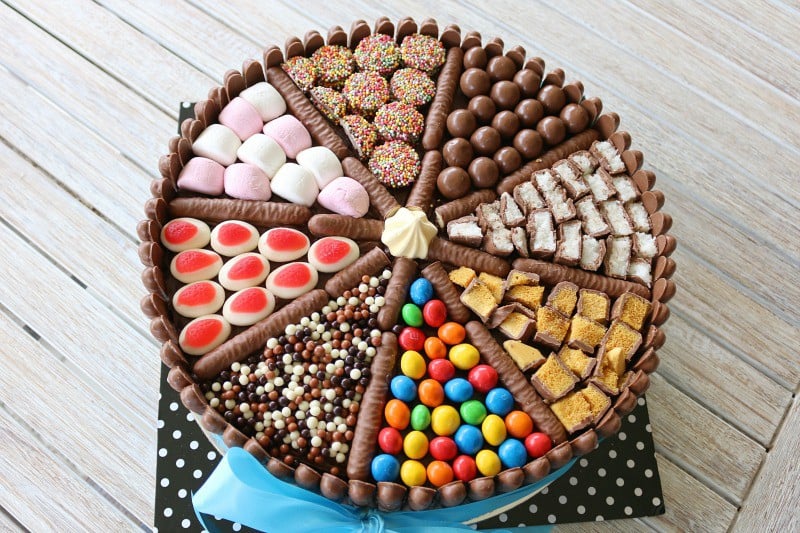
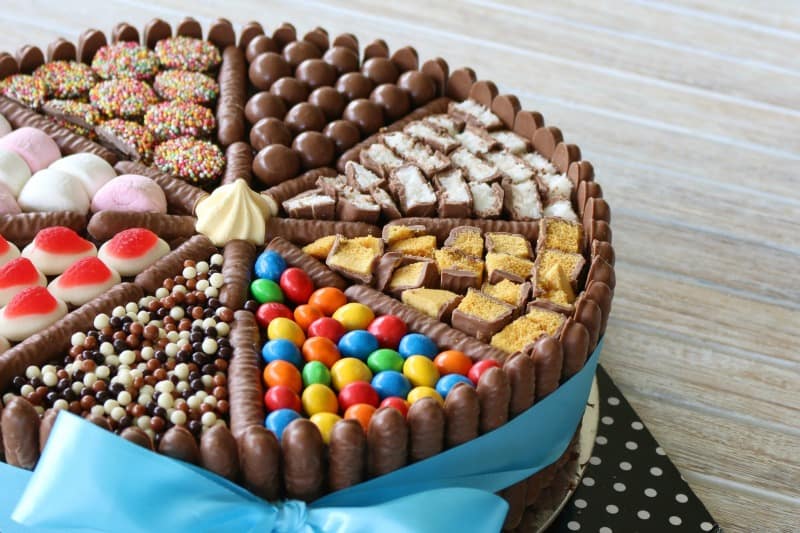
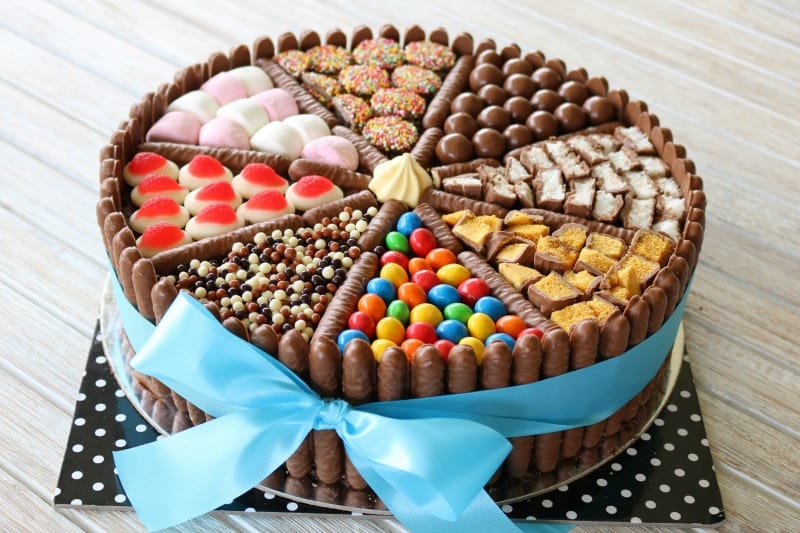
Chocolate fingers - these are biscuit/cookie sticks that have been coated in chocolate. I generally use Cadbury branded chocolate fingers. If you can't buy chocolate fingers, you can replace them with Kit Kats.
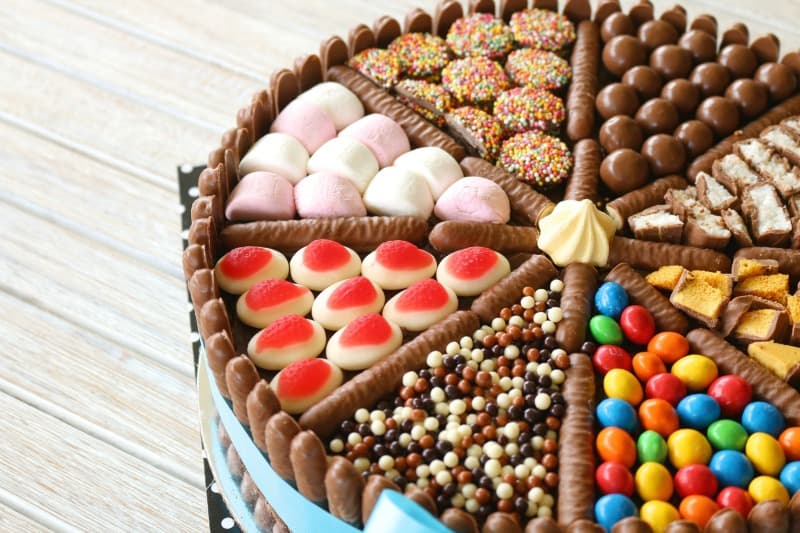
Lollies - this is the fun part! Use a selection of all your favourite lollies... from jelly beans to marshmallows, gummy bears to strawberries and cream - and so any more!
Chocolates - again this is your chance to use all yorr favourite chocolates and chocolate bars. From Maltesers, to Bounty bars, choc honeycomb to freckles, M&Ms to Twix bars and more.
How To Decorate
- Place the chocolate mud cake onto a serving plate or board.
- Spread the frosting generously over the sides and top of the cake.
- Press the chocolate fingers (or Kit Kats) firmly in place all around the sides of the cake.
- Use extra chocolate fingers to create 'dividers' on top of the cake (use as many 'dividers' as you need depending on the number of different chocolate/lollies planning you have).
- Fill each section with a different type of chocolate or lolly.
- Add a mini meringue to the centre of the cake.
- Use the ribbon to tie a bow around the cake.
Recipe Tips & FAQ
- Time savings options - if you're short on time, use a store-bought mud cake and tub of frosting.
- Go heavy on the frosting - slather the cake with lots of frosting on the sides and top to help keep the chocolate fingers and decorations in place.
- Size of chocolates and lollies - it's best to use smaller lollies and chocolates as they're easier to fit in the little gaps
- Chocolate fingers alternative - if you prefer, you can replace the chocolate fingers with Kit Kats, musk sticks or even licorice sticks
- Colour - go for bright coloured toppings - they look great! Or choose colour co-ordinated lollies for a baby shower or party.
- Storing - this cake can be stored in an airtight container at room temperature for 3-4 days.
- Making the cake ahead of time - you can prepare the cake, allow it to cool completely, wrap in plastic wrap and then a layer of foil and freeze for up to 3 months. Allow to defrost in the fridge overnight before frosting and decorating.
More Simple Cake Recipes
If you're after some more easy cakes that are perfect for parties and special celebrations, check out my entire collection of cake recipes here, including:
- My classic butter cake - perfect for decorating for birthday parties!
- Caramel mud cake - dense and delicious
- White chocolate mud cake - a good old classic favourite
- M&Ms cake - another cake using chocolate fingers!
WANT EVEN MORE DELICIOUS RECIPES? Subscribe to my newsletter or follow along on Facebook or Instagram. And if you love baking, then please come and join my Facebook cooking club group or subscribe to my YouTube channel.

Chocolate Fingers Cake
Ingredients
For the cake
- 220 g (1 and ¾ cups) plain flour
- 350 g (1 and ¾ cups) caster sugar superfine sugar
- 65 g (¾ cup) cocoa powder
- 1 teaspoon baking powder
- 2 teaspoon bi-carbonate soda
- 1 teaspoon salt
- 250 g (1 cup) buttermilk
- 125 g (½ cup) vegetable oil
- 2 eggs
- 1 teaspoon vanilla extract
- 250 g coffee 2 espresso shots or 3 teaspoon coffee granules mixed with 250g water
For the frosting
- 250 g unsalted butter
- 360 g icing sugar
- 65 g (¾ cup cocoa powder
- 45 g milk
- 1 teaspoon vanilla extract
- ½ teaspoon salt
To decorate
- 800 g chocolate finger biscuits I used Cadbury brand (or replace with Kit Kats)
- your choice of chocolates and lollies chocolate freckles, marshmallows, crispy M&Ms, Maltesers, Bounty bars, chocolate honeycomb, chocolate pops, strawberries and cream lollies, mini meringues etc.
Instructions
To make the cake
- Preheat oven to 170 degrees celsius (fan-forced). Grease a 23cm round tin and set aside.
- Sift the flour, sugar, cocoa powder, baking powder, bi-carbonate soda and salt into a bowl and set aside.
- Using beaters or a stand mixer, mix the buttermilk, oil, room temperature eggs and vanilla in a large bowl until well combined.
- Slowly add all of the dry ingredients to the wet ingredients with the mixer on low. Pour in the coffee and mix until well combined.
- Pour the batter into the prepared tin and bake for approximately 35 minutes or until a toothpick inserted in the centre comes out clean (don't overcook the cake - you want it to be nice and fudge-like!).
- Allow to cool completely.
To make the frosting
- Beat the butter on high speed until smooth and creamy.
- Reduce the speed to low and slowly add in the icing sugar as well as the cocoa powder. Beat until combined.
- Turn the mixer up to medium speed and add in the vanilla extract, milk and salt. Beat on high speed for 1 minute.
To decorate
- Place the chocolate mud cake onto a serving plate or board.
- Spread the frosting generously over the sides and top of the cake.
- Press the chocolate fingers (or Kit Kats) firmly in place all around the sides.
- Use the chocolate fingers to create 'dividers' on top of the cake (use as many 'dividers' as you need depending on the number of different chocolate/lollies planning you have).
- Fill each section with a different type of chocolate or lolly.
- Add a mini meringue to the centre of the cake.
- Use the ribbon to tie a bow around the cake.
Notes
- Time savings options - if you're short on time, use a store-bought mud cake and tub of frosting.
- Go heavy on the frosting - slather the cake with lots of frosting on the sides and top to help keep the chocolate fingers and decorations in place.
- Size of chocolates and lollies - it's best to use smaller lollies and chocolates as they're easier to fit in the little gaps
- Chocolate fingers alternative - if you prefer, you can replace the chocolate fingers with Kit Kats, musk sticks or even licorice sticks
- Colour - go for bright coloured toppings - they look great! Or choose colour co-ordinated lollies for a baby shower or party.
- Storing - this cake can be stored in an airtight container at room temperature for 3-4 days.
- Making the cake ahead of time - you can prepare the cake, allow it to cool completely, wrap in plastic wrap and then a layer of foil and freeze for up to 3 months. Allow to defrost in the fridge overnight before frosting and decorating.


Tina says
I love making this cake. I have made 3 so far, for family birthday's, each time I receive great feedback, it freezes well ahead of time too
Aija says
My oven is currently broken do you reckon I could use store bought cake?
Lucy says
Absolutely!
Aija says
Thank you
Keep the recipes coming
Lucy says
I promise I will!
Janet Smithers says
Hi,
Would this recipe be fine for 3 layers for 6 inch tin?
Lucy says
Yes, however I would reduce the cooking time as the layers will be quite thin. 🙂
Eileen.cafull says
Loved making them
Tricia says
Fabulous cake. Needed 20 mins more cooking time but worth it. Used sweets to taste of person I was giving the cake too. So really well accepted and tasted amazing
Lucy says
Fantastic!