

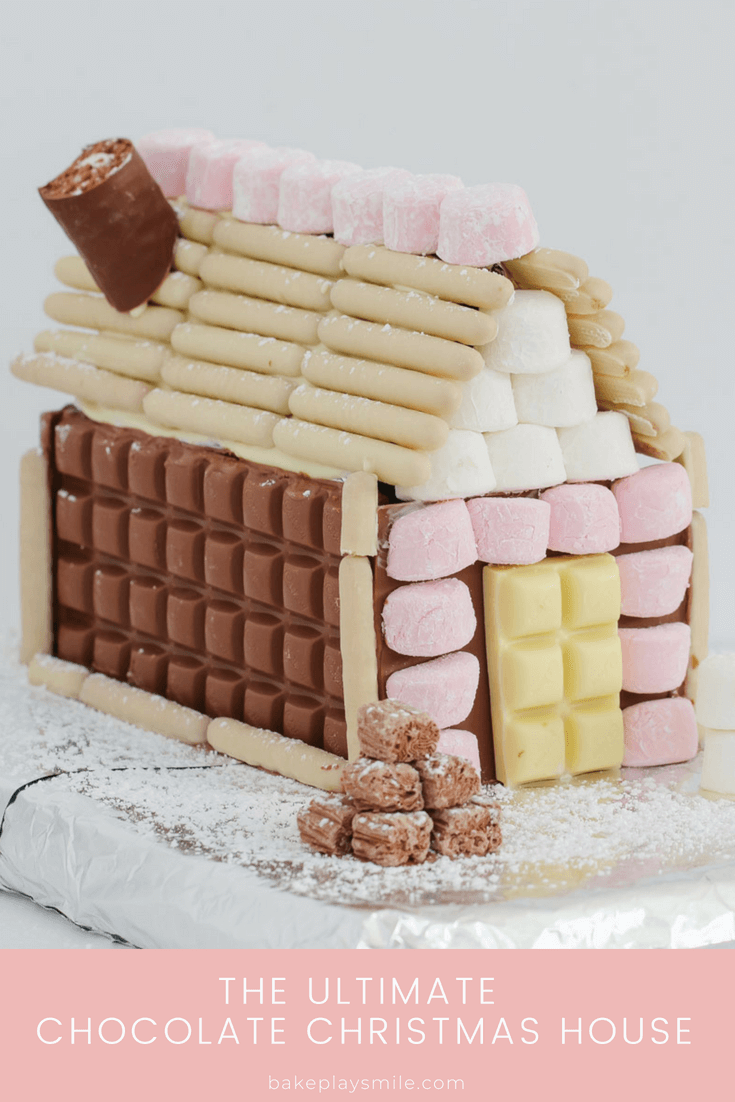
Forget a boring old gingerbread house - this Chocolate Christmas House is basically an edible chocolate fort you get to demolish on Christmas Day.
It's every bit as fun to make as our Reindeer Brownies or Mini Christmas Puddings, just a whole lot more showstopper-y sitting in the middle of the table.
A Quick Look At The Recipe
🍫 Recipe: Chocolate Christmas House
⏱️ Ready In: 30 minutes (plus setting time)
🍽️ Serves: 20
🔥 Calories: 201 per serve
🧾 Main Ingredients: Milk chocolate blocks, white chocolate, marshmallows, chocolate Finger biscuits, Flake bars
🥛 Dietary Info: Vegetarian. No oven required. Can be made gluten free and dairy free with the right chocolate swaps (see Variations below)
❤️ Why You'll Love It: No baking, no fuss, and it looks like you spent way longer on it than you actually did
SUMMARIZE & SAVE THIS CONTENT ON
This one's an oldie on the blog, but it's still one of the most fun things you'll make with the kids these school holidays.
It pairs nicely on the dessert table with a White Christmas Slice or some Christmas Crackles, and since you'll have chocolate Finger biscuits left over, my Chocolate Fingers Cake is a great way to use them up.
Jump to:
Why You're Going To Love This Recipe
- No oven, no baking, no fuss - just melted chocolate and a bit of patience
- It looks incredible sitting in the middle of the Christmas table, but it's genuinely doable with kids helping
- A much tastier alternative to a gingerbread house (sorry gingerbread, you're just not the same)
- You can use literally any chocolate or lollies you've got in the pantry to decorate it
Chocolate Christmas House Ingredients
Chocolate blocks: use whatever chocolate you like here - Cadbury Dairy Milk is the classic, but a good quality supermarket block works just as well and it's much cheaper than buying a kit.
Chocolate Finger biscuits: these make the roof tiles. Can't find them? Wafer biscuits or even Tim Tams cut to size will do the job. If you love the flavour of chocolate fingers, you have to try my Chocolate Fingers Cake too.
Flake bars: these get chopped up to look like a stack of firewood by the front door. Any chocolate log or stick-shaped chocolate will work.
Variations
- Dark chocolate house - swap the milk chocolate blocks for dark for a less sweet, grown-up looking version
- Skip the mini rolls and marshmallows and go all white chocolate for a "White Christmas" cottage look
- Make a few mini versions instead of one big house - great for a class party or for the kids to take one each
- Gluten free? Swap the chocolate Finger biscuits for a gluten free wafer biscuit, and double check your marshmallows and Flake bars are GF too
- Dairy free family coming for Christmas lunch? There are some really good dairy free chocolate blocks around now that melt and set just like the real thing
How To Make A Chocolate Christmas House
The trick with a chocolate house isn't the recipe - it's patience.
Melted chocolate is your glue, and you need to let it set properly between steps or the whole thing ends up in a sad chocolate puddle.
Read through all the steps once before you start so you're not caught out.
- Step 1: Set up your base. Cover a flat board with foil (a chopping board is perfect). Sit a small empty container in the centre - it'll hold your walls steady while the chocolate sets.
- Step 2: Build the side walls. Spread a little melted milk chocolate along both long sides of the board and stand a whole block of chocolate up on each side, using the container to keep them steady while they set.
- Step 3: Add the front and back walls. Cut your remaining two blocks to size and glue them into place with more melted chocolate (you'll have a few rows left over from each block - save them for snacking or the Variations).
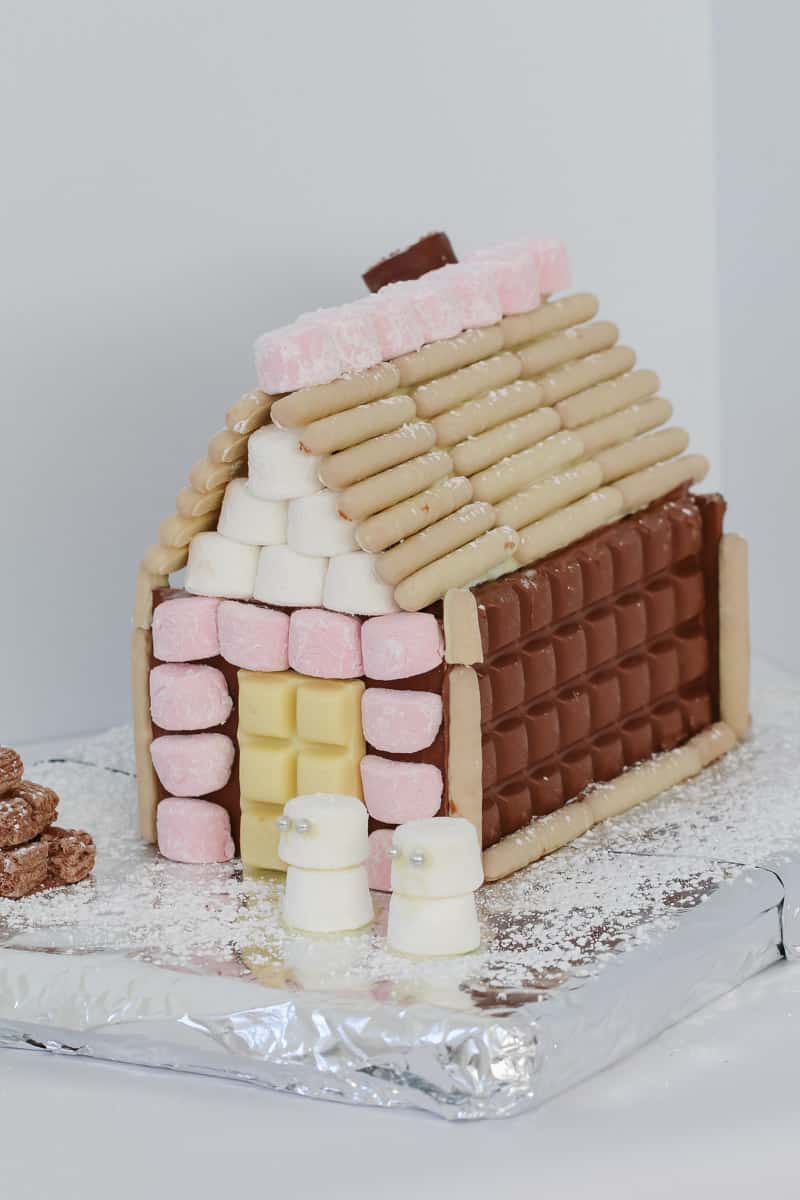
- Step 4: Add the door and trim. Melt some white chocolate and use it to glue on a white chocolate door, then dot marshmallow halves around it (cut them so they sit flat).
- Step 5: Make the roof panels. Cover two long rectangles of cardboard or a plastic lid in foil. Spread melted white chocolate over the whole area, lay the chocolate Finger biscuits on top like roof tiles, then pop into the fridge to set.
- Step 6: Attach the roof and chimney. Add a little melted chocolate to the top of the walls and gently balance the roof pieces in place. Glue on a Cadbury mini roll for the chimney with more melted chocolate.
- Step 7: Decorate the roof. Add melted chocolate to the top of the house and decorate with marshmallows. Press marshmallows along the front edge of the roof too - you probably won't even need chocolate to stick these ones, just squish them into place.
- Step 8: Add the finishing touches. Make little marshmallow snowmen with melted white chocolate (silver cachous work well for eyes). Chop the Flake bars into pieces and glue them together to look like a stack of firewood. Finish with a generous dusting of icing sugar for snow.
Recipe Tips
- Have plenty of melted chocolate ready to go - it's what holds every single piece together, and running out mid-build is the fastest way to end up with a leaning house
- Stop the walls collapsing by propping them up with cans, glasses or small containers while the chocolate sets, and don't rush it - walking away for 10 minutes is genuinely fine
- If your kitchen is warm, work in bursts and pop the house in the fridge between steps so the chocolate has a chance to firm up
- If your melted chocolate suddenly turns thick, grainy or clumpy (this is called seizing), it usually means a drop of water got into it - start again with a fresh batch and keep your bowl and spoon completely dry
- Storage: once assembled, the house is best kept somewhere cool and out of direct sun - it doesn't freeze or reheat, so this is a make-and-display treat rather than a make-and-freeze one
- Make ahead: you can build it a day or two before you need it. Just cover it loosely with foil (don't wrap it tightly or you'll knock decorations off) and keep it somewhere cool until it's time to show it off
Chocolate Christmas House FAQs
A couple of days ahead is fine. Once it's fully set, cover it loosely with foil (tight wrapping can knock off decorations) and keep it somewhere cool until you're ready to bring it out for the big day.
Prop them up. Small containers, cans or even a couple of drinking glasses either side of each wall will hold everything steady while the chocolate firms up, then you just slide them out once it's set. Rushing this step is the number one reason houses fall over.
That's called seizing, and it almost always comes down to water. A stray drop from a wet spoon or bowl is enough to ruin a whole batch. There's no fixing seized chocolate, so tip it out, dry your equipment properly and start fresh.
Yes, any chocolate works for the walls and roof. Dark chocolate gives a richer, less sweet look and white chocolate gives you that snowy cottage feel. Just keep the same quantities as the recipe card.
Keep it somewhere air conditioned or at least out of direct sun for as long as possible, and only bring it out to the table right before serving. If you're really worried about the heat, build it a day ahead and store it in the fridge, then let it sit at room temperature for 10 minutes before it goes on display.
More Christmas Treats
If building this chocolate house has got you in the Christmas mood, here are a few more easy, no-bake treats to add to your baking list this year.



Chocolate Christmas House
Ingredients
- 4 X 200 g blocks milk chocolate
- 1 X 280 g bag marshmallows
- 3 X 114 g packets chocolate Finger biscuits
- 1 X 200 g block white chocolate
- 3 X 30 g Flake bars
- 1 packet Cadbury mini rolls
- extra white and milk chocolate, for melting
- icing sugar, to sprinkle
Instructions
- Start with a flat board and cover it in foil (I used a chopping board).
- Place a small container in the centre of the board to help hold up the chocolate walls.
- Spread a little melted milk chocolate along the two long 'wall' sides of the board.
- Place 1 full block on each side (using the container to help keep them standing up while the chocolate dries and sets the blocks in place).
- Cut the remaining two blocks and secure with extra melted chocolate to form the front and back of the house (you'll have a few rows from each block leftover).
- Use melted white chocolate to 'glue' on the front white chocolate door and the marshmallow decorations around the door (cut the marshmallows in half so they sit nice and flat).
- To make the roof, cover two long rectangles with foil (I used plastic lids from containers but you could also use cardboard and cover it in foil too).
- Lay the two rectangles flat on a bench and spread melted white chocolate over the entire area of foil. Lay the chocolate finger biscuits on the melted chocolate and place into the fridge to set.
- Add a little melted chocolate to the top of the long walls and gently place the roof pieces in place (you might need to balance them a little bit!).
- Add some melted chocolate to one side of the roof and 'stick on' the chimney.
- Add melted chocolate to the top of the house and decorate with marshmallows.
- Add marshmallows to the front of the roof (I actually didn't even need to use melted chocolate for this - I just squished them into place and they didn't move).
- If you'd like extra chocolate Fingers around the edge of the house, simply spread over a little melted chocolate and stick them in place.
- Make little snowmen with marshmallows and melted white chocolate (I used little edible silver baubles for the eyes).
- Chop the Flake bars into small pieces and 'glue' them together with melted chocolate to resemble a stack of firewood.
- Dust the entire board and house lightly with icing sugar to resemble snow.


Leave a Reply