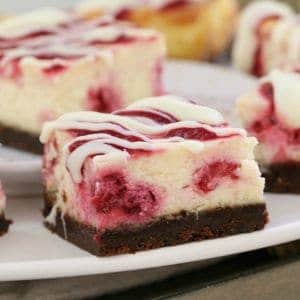
The BEST White Chocolate & Raspberry Cheesecake Slice
You will love these delightfully luscious, white chocolate and raspberry cheesecake bars!
Print
Pin
Servings: 16 serves
Calories: 343kcal
Equipment
- Food processor, beaters or Thermomix
- Microwave or Thermomix
- Oven
Ingredients
- 250 g chocolate ripple biscuits or any plain chocolate biscuits, crushed
- 100 g butter melted
- 500 g cream cheese room temperature
- 175 g (¾ cup) sour cream
- 150 g (⅔ cup) caster sugar
- 2 eggs room temperature, lightly beaten
- 1 teaspoon vanilla extract
- 150 g white chocolate melted and slightly cooled
- 200 g (1 ½ cups) raspberries fresh or frozen, plus extra to decorate
Optional
- raspberry coulis store bought or homemade. A little can be swirled through the mix before baking, or drizzle some over the top before serving.
Instructions
Conventional Method
- Preheat oven to 160 degrees celsius (fan-forced). Grease and line a large 32cm x 28cm rectangular slice tin with baking paper.
- Place the crushed chocolate biscuits into a bowl and pour over the melted butter. Mix until well combined. Firmly press into the prepared tin and set aside.
- Beat the cream cheese, sour cream, caster sugar, lightly beaten eggs, and vanilla extract in a large bowl until smooth and creamy.
- Add the melted white chocolate and beat until smooth and combined.
- Fold the raspberries gently through with a spatula.
- Pour the mixture into the prepared tin and spread out evenly with a spoon.
- Optional - if using raspberry coulis, dot about 6-8 tablespoons of coulis randomly over the top the the slice. Then, use a knife to gently swirl the mixture a few times. Don't overmix the coulis or it will lose the pretty swirl effect.
- Place into the oven for 40-50 minutes or until firm in the centre. Note: if you notice the slice is over-browning and still isn't cooked through, place a sheet of foil loosely over the top and continue cooking.
- Once completely cooled, place in the fridge for at least 4 hours (preferably overnight) before cutting into slices.
- Decorate with extra raspberries, berry coulis and melted white chocolate drizzled over the top (optional).
Thermomix Method
- Preheat oven to 160 degrees celsius (fan-forced). Grease and line a large 32cm x 28cm rectangular slice tin with baking paper.
- Place the butter into the Thermomix bowl and melt for 2 mins, Speed 2, 100 degrees (or until melted). Add the chocolate ripple biscuits into the Thermomix bowl and crush for 6 seconds, Speed 10. Firmly press the biscuit mixture into the prepared tin and set aside.
- Place the white chocolate into a clean and dry Thermomix bowl. Melt for 3 minutes, 60 degrees, Speed 1 (or until melted). Allow to cool slightly.
- Add the cream cheese, sour cream, caster sugar, eggs, and vanilla extract. Mix for 15 seconds, Speed 5. Scrape down the sides of the bowl and repeat for a further 15 seconds (or until smooth).
- Fold the raspberries gently through with a spatula.
- Pour the mixture into the prepared tin and spread out evenly with a spoon.
- Optional - if using raspberry coulis, dot about 6-8 tablespoons of coulis randomly over the top the the slice. Then, use a knife to gently swirl the mixture a few times. Don't overmix the coulis or it will lose the pretty swirl effect.
- Place into the oven for 40-50 minutes or until firm in the centre. Note: if you notice the slice is over-browning and still isn't cooked through, place a sheet of foil loosely over the top and continue cooking.
- Once completely cooled, place in the fridge for at least 4 hours (preferably overnight) before cutting into slices.
- Decorate with extra raspberries, berry coulis and melted white chocolate drizzled over the top (optional).
Notes
RECIPE NOTES & TIPS
- Cream cheese - soften to room temperature to avoid lumps in the mixture.
- Raspberry coulis - this is an optional ingredient, but highly recommended! You can use any type of store bought raspberry coulis, or homemade if you prefer. Swirl a little over the top of the cheesecake (dot some over the top and use a knife to swirl it) before baking and then add a little more to serve with some fresh berries. LOOKS AMAZING!
- Traditional cheesecake or cheesecake slice - if you prefer, you can follow the same recipe but press into a round springform tin instead. However, I find the benefit of a slice is that it’s easy to cut into pieces, perfect for taking to a special morning or afternoon tea, or serving as a dessert to a number of guests.
- Tips to stop the cheesecake from cracking -
- Firstly, don’t overbeat your mixture, as this will cause the filling to crack when cooked.
- You can also place a small, oven-safe baking dish filled with water at the bottom of the oven. This will keep the cheesecake moist.
- Baking the cheesecake at a relatively low temperature also helps the cheesecake to cook slowly and prevents the filling from over-baking (which can also cause cracks).
- After the slice has finished cooking, you can leave the oven door open for an hour to allow the cheesecake to slowly cool. Avoiding a sudden change in temperature will help to minimise any cracking or sinking.
- Serving - you will need to chill the cheesecake for at least 4 hours (or preferably overnight) for it to fully set before slicing and serving. Then, you can serve it as is, or decorate it with white chocolate shavings, extra berries and some raspberry coulis (optional).
- Storage - this cheesecake keeps well in the fridge in an airtight for up to 5 days.
Nutrition
Calories: 343kcal | Carbohydrates: 28g | Protein: 4g | Fat: 25g | Saturated Fat: 13g | Cholesterol: 76mg | Sodium: 242mg | Potassium: 143mg | Fiber: 1g | Sugar: 22g | Vitamin A: 675IU | Vitamin C: 3.1mg | Calcium: 72mg | Iron: 1.7mg
